“`html
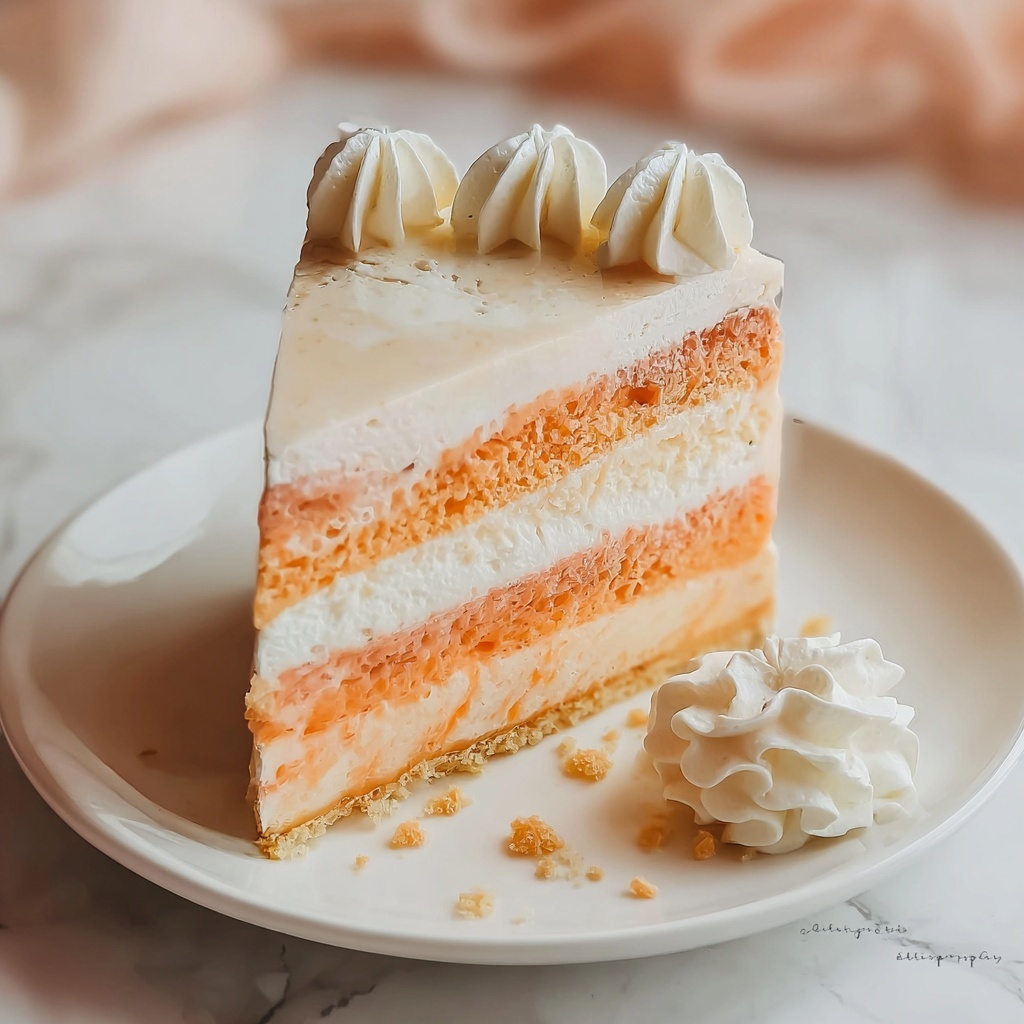
Imagine diving into a dessert that perfectly captures the nostalgic flavors of a childhood favorite treat with the ease and elegance of something homemade. This No Bake Orange Creamsicle Cheesecake Recipe is exactly that—an irresistible blend of creamy, tangy, and sweet goodness that requires no oven and only a little patience while it sets. Bright orange jello swirled into lush cream cheese and whipped cream creates a dreamy, fluffy texture bursting with citrusy sunshine, all held together by a buttery vanilla wafer crust. If you love that classic creamsicle flavor and want a hassle-free way to impress your friends and family, this cheesecake will quickly become your go-to dessert.
Ingredients You’ll Need
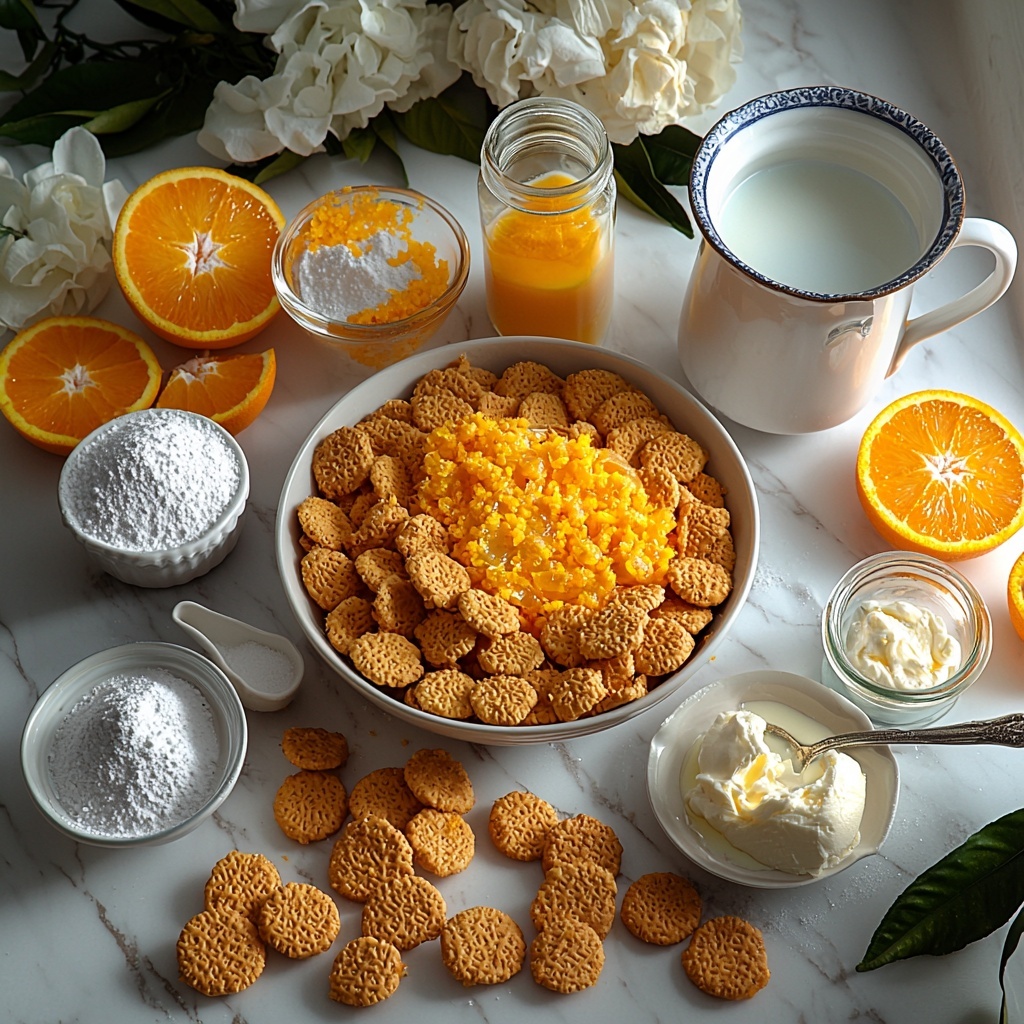
Simple, fresh, and essential—the ingredients in this recipe work harmoniously to build layers of flavor and texture that make this cheesecake truly special. Each one plays a crucial role, from the buttery vanilla wafer crust that adds a light crunch to the bright orange zest and jello that give it that unmistakable creamsicle vibe.
- 11 ounces vanilla wafers, finely crushed: Provides a sweet, crispy base that perfectly contrasts the creamy filling.
- 3 tablespoons granulated sugar: Adds just the right amount of sweetness to the crust.
- 8 tablespoons unsalted butter, melted: Binds the crushed wafers to form a rich and buttery crust.
- 2 cups heavy cream: Whipped to fluffy perfection, lending lightness and creaminess to the cheesecake layers.
- ½ teaspoon clear vanilla flavoring: Enhances the sweetness and adds depth without overpowering the orange flavors.
- ½ cup powdered sugar, plus 1 tablespoon: Sweetens the whipped cream delicately and balances the citrus tang.
- ¾ cup boiling water: Used to dissolve the orange-flavored jello, creating that vibrant, zesty component.
- 3 ounces orange-flavored jello: Injects bright citrus flavor and color, essential for that creamsicle essence.
- 1 tablespoon orange zest (about 2½ to 3 tablespoons depending on size): Adds natural freshness and a subtle texture boost.
- 16 ounces cream cheese, softened: The star of the creamy cheesecake filling, smooth and tangy.
- ¾ cup granulated sugar: Sweetens the cream cheese layer, ensuring it’s rich but not too sweet.
- ½ teaspoon clear vanilla flavoring: Rounds out the flavor and combines beautifully with the cream cheese and orange.
How to Make No Bake Orange Creamsicle Cheesecake Recipe
Step 1: Prepare the Crust
Start by spraying your 9-inch springform pan with nonstick spray to ensure the cheesecake releases easily later on. Next, mix the finely crushed vanilla wafers with granulated sugar and melted butter until well combined. Press this mixture firmly into the bottom of your pan to create an even, compact crust, then pop it into the freezer to chill while you prepare the filling. This chilling step helps the crust hold its shape under that luscious cheesecake layer.
Step 2: Whip the Cream
In a large bowl, whip the heavy cream along with the clear vanilla flavoring and powdered sugar on high speed until stiff peaks form. This whipped cream will add lightness to both the orange and cream cheese layers, so dividing it into portions as prescribed allows for perfect folding and texture balance throughout the dessert.
Step 3: Make the Orange Layer
Dissolve the orange-flavored jello and fresh orange zest in boiling water, stirring thoroughly until everything is fully blended. Allow this mixture to cool completely—it’s important not to rush this step, as folding warm jello into whipped cream will deflate the light texture. Once cooled, fold half of one portion of the whipped cream gently into the jello mixture, reserving a little to swirl later for that iconic creamsicle marbled look.
Step 4: Prepare the Cream Cheese Filling
Beat the softened cream cheese until smooth and creamy, then mix in the granulated sugar and clear vanilla flavoring. Once your cream cheese base is silky, gently fold in half of the remaining whipped cream portion. Hold back some of this creamy mixture to create the lovely swirl effect when layering the cheesecake. This careful folding ensures the filling stays fluffy and light.
Step 5: Assemble the Cheesecake
Start by spreading the cream cheese mixture evenly over the chilled crust, leaving some room at the top for the swirls. Add dollops of the reserved orange cream mixture randomly across the surface. Using a fork, gently swirl these dollops into the cheesecake layer to create that gorgeous creamsicle pattern. Next, spread the reserved cheesecake mixture over the swirls, then top it off evenly with the remaining orange cream to complete the layered effect.
Step 6: Chill and Set
Cover your springform pan and refrigerate the cheesecake for at least 6 hours or overnight. This time is key to allowing the flavors to meld and the cheesecake to set firmly for clean slices and that perfect creamy texture.
Step 7: Ready to Serve
When you’re ready to enjoy, run a sharp knife carefully around the pan’s edges, then remove the springform ring. This careful step keeps your cheesecake looking pristine and allows you to present it beautifully.
How to Serve No Bake Orange Creamsicle Cheesecake Recipe
Garnishes
To highlight the sunshine-inspired flavors, sprinkle extra orange zest or a few thinly sliced orange segments on top for a fresh pop of color and zing. A handful of white chocolate shavings or edible flowers can also add an elegant touch for special occasions.
Side Dishes
This cheesecake pairs beautifully with light berries or a crisp fruit salad to complement its creamy texture. For a summery vibe, serve alongside chilled mint tea or a sparkling citrus mocktail, which will refresh the palate between bites.
Creative Ways to Present
Try serving individual portions in clear cups with layers of crushed vanilla wafers, cheesecake, and orange cream for a fun twist. Alternatively, decorate the top with a swirl of whipped cream and a small orange slice for an eye-catching single-serve treat at parties or gatherings.
Make Ahead and Storage
Storing Leftovers
Once cooled and set, store your leftover No Bake Orange Creamsicle Cheesecake Recipe in an airtight container in the refrigerator. It will stay fresh and delicious for 3 to 4 days, giving you plenty of time to enjoy every last creamy bite.
Freezing
If you want to prepare the cheesecake ahead of time or save some for later, it freezes wonderfully. Wrap the cheesecake tightly with plastic wrap and foil to protect it from freezer burn. It can be stored frozen for up to 1 month. When ready to eat, thaw overnight in the refrigerator for the best texture.
Reheating
This dessert is best enjoyed chilled and does not require reheating. Allow it to come to just slightly below room temperature for optimal flavor and creaminess before serving if it’s been in the fridge.
FAQs
Can I use a different flavor of jello for this recipe?
While orange jello is key to achieving that authentic creamsicle flavor, you can experiment with other citrus flavors like lemon or tangerine to create a similar effect. Keep in mind the flavor profile will change accordingly.
Do I need to use clear vanilla flavoring?
Clear vanilla flavoring helps keep the cheesecake’s bright colors vibrant. If you can only find regular vanilla extract, it’s okay to use it, but it may slightly darken the creamy layers.
Is it necessary to chill the crust before adding the filling?
Yes, chilling the crust firms it up, which prevents the crust from becoming soggy once the creamy layers are added. Freezing for a short time as directed ensures a nice solid base.
How can I ensure the whipped cream doesn’t deflate when folding it into other ingredients?
Fold gently using a spatula with slow, sweeping motions rather than stirring or beating. This preserves the airiness vital for the cheesecake’s light texture.
Can I make this cheesecake gluten-free?
Absolutely! Simply swap out the vanilla wafers for a gluten-free alternative or use crushed gluten-free cookies. The cream cheese and orange layers stay the same.
Final Thoughts
This No Bake Orange Creamsicle Cheesecake Recipe combines simplicity with stunning flavor and texture, making it a must-try for any cheesecake lover or creamsicle enthusiast. Whether you’re making it for a weeknight treat or a special occasion, its bright and creamy layers are guaranteed to bring smiles and requests for seconds. Give it a try and let this dreamy dessert brighten your day!
“`
Print
No Bake Orange Creamsicle Cheesecake Recipe
- Prep Time: 25 minutes
- Cook Time: 0 minutes
- Total Time: 6 hours 25 minutes
- Yield: 8 servings
- Category: Dessert
- Method: No-Cook
- Cuisine: American
Description
This No Bake Orange Creamsicle Cheesecake is a delightfully creamy and refreshing dessert that combines the classic citrus flavor of orange with a smooth vanilla cheesecake base. With a crisp vanilla wafer crust, luscious layers of whipped cream-infused orange gelatin, and a swirl of zesty orange and creamy cheesecake, this dessert requires no oven and is perfect for warm days or any time you want an easy yet impressive treat. It needs several hours to chill and set, making it ideal to prepare ahead of time for gatherings or special occasions.
Ingredients
Crust
- 11 ounces vanilla wafers, finely crushed
- 3 tablespoons granulated sugar
- 8 tablespoons unsalted butter, melted
Orange Gelatin Mixture
- ¾ cup boiling water
- 3 ounces orange-flavored jello
- 1 tablespoon orange zest (about 2½ to 3 tablespoons depending on orange size)
Whipped Cream
- 2 cups heavy cream
- ½ teaspoon clear vanilla flavoring
- ½ cup powdered sugar, plus 1 tablespoon
Cheesecake Filling
- 16 ounces cream cheese, softened
- ¾ cup granulated sugar
- ½ teaspoon clear vanilla flavoring
Instructions
- Prepare the Pan and Crust: Spray a 9-inch springform pan lightly with nonstick spray. In a bowl, mix the finely crushed vanilla wafers with granulated sugar and melted butter until well combined. Press the mixture firmly and evenly into the bottom of the springform pan. Place the crust in the freezer to set while preparing the other components.
- Whip the Cream: In a chilled mixing bowl, whip the heavy cream with the clear vanilla flavoring and powdered sugar on high speed until stiff peaks form. Once whipped, divide the cream into two portions for layering later.
- Make the Orange Gelatin Mixture: In a separate bowl, dissolve the orange-flavored jello and the orange zest in the boiling water. Stir until completely dissolved and then allow the mixture to cool fully at room temperature or in the refrigerator.
- Fold Gelatin into Whipped Cream: Fold half of one portion of the whipped cream gently into the cooled orange gelatin mixture until combined. Reserve ½ cup of this orange cream mixture for swirling on top.
- Prepare the Cheesecake Filling: In a large bowl, beat the softened cream cheese until smooth and creamy. Add the granulated sugar and vanilla flavoring to the cream cheese and mix until fully incorporated. Fold half of the remaining whipped cream into this cream cheese mixture. Reserve about ¾ cup of this cheesecake mixture for swirling.
- Assemble the Cheesecake Layers: Spread the larger portion of the cheesecake mixture evenly over the chilled crust, leaving some space on top for swirling. Dollop the reserved ½ cup orange cream mixture randomly over the cheesecake layer, then gently swirl it in using a fork to create a marbled effect.
- Add Remaining Layers: Spread the reserved ¾ cup cheesecake filling over the swirled layer, smoothing it out. Top it with the remaining orange cream mixture, spreading it evenly over the surface to complete the layered look.
- Chill to Set: Refrigerate the assembled cheesecake for at least 6 hours or preferably overnight to allow it to firm up properly.
- Serve: Before serving, run a knife around the edge of the pan to loosen the cheesecake, then carefully remove the springform ring. Slice and enjoy this creamy, citrusy treat.
Notes
- Ensure the orange gelatin mixture is completely cooled before folding into whipped cream to prevent deflating the whipped cream or melting the gelatin prematurely.
- Using a springform pan makes it easier to remove the cheesecake without damaging its layers.
- You can adjust the amount of orange zest to your preference for stronger or milder citrus flavor.
- For best texture, chill the crust in the freezer to set firmly before adding the filling layers.
- This cheesecake should be stored in the refrigerator and consumed within 3-4 days for optimal freshness.
- If you prefer a slightly firmer texture, you can increase the gelatin by a small amount, but the recipe is balanced for a creamy consistency.


