
“`html
If you’re craving a refreshingly cool treat that’s both wholesome and bursting with flavor, you’ve got to try Frozen Yogurt Pops: The Ultimate Guide to Homemade Treats Recipe. These popsicles deliver the perfect balance of creamy Greek yogurt, naturally sweet fruit, and just a hint of honey or maple syrup to brighten your day. Whether you’re enjoying them on a sunny afternoon or looking for a guilt-free dessert, these frozen delights combine simple ingredients with fun customization, making this recipe a timeless favorite.
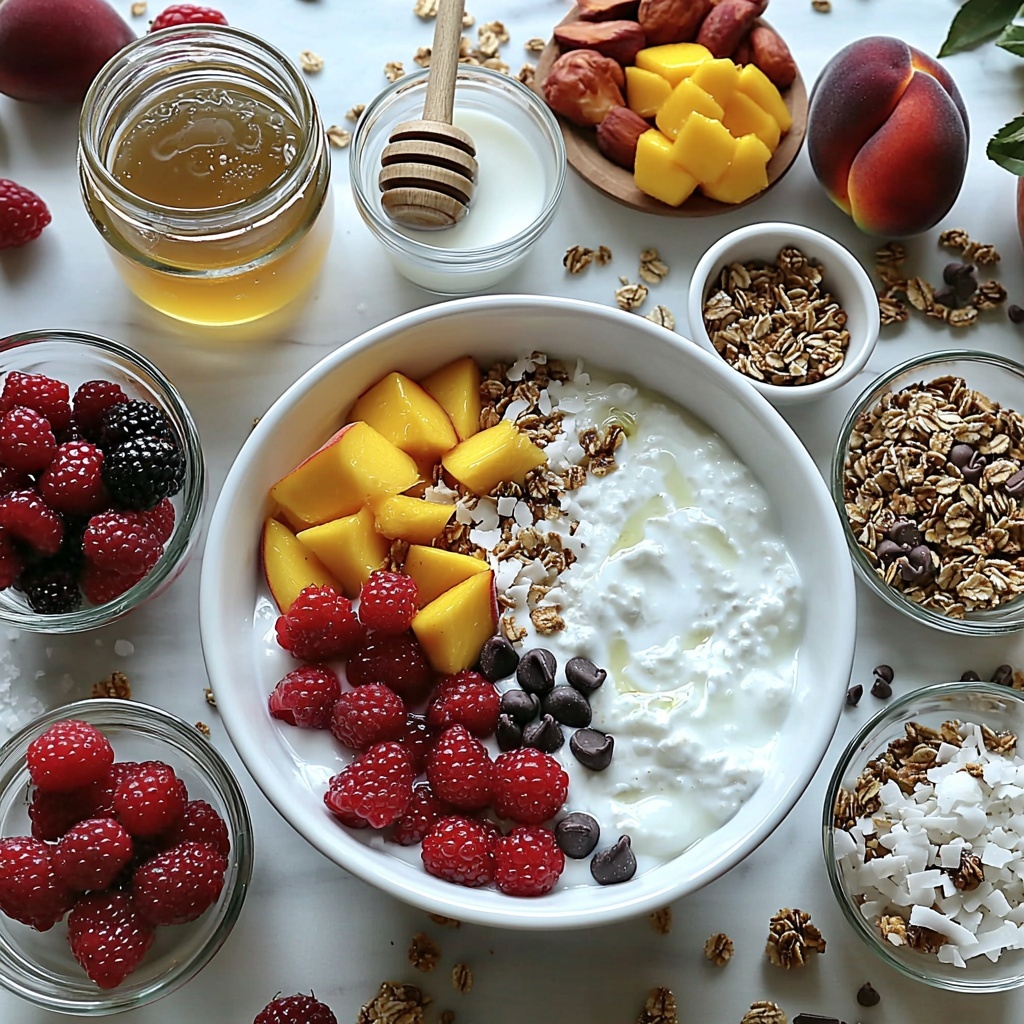
Ingredients You’ll Need
Getting your ingredients ready for these frozen yogurt pops couldn’t be easier. Each component plays a starring role in bringing creamy texture, natural sweetness, and vibrant color to your homemade treats.
- 4 cups plain Greek yogurt (full-fat or non-fat): This is the creamy base that packs protein and tang, creating a luscious mouthfeel.
- 1 cup fresh or frozen fruit (berries, mango, peaches, etc.): Choose your favorite fruits for bursts of sweetness and beautiful pops of color.
- ½ cup honey or maple syrup (adjust to taste): Adds natural sweetness to balance the tangy yogurt perfectly.
- 1 teaspoon vanilla extract (optional): A subtle hint of vanilla to elevate the flavor profile beautifully.
- ¼ cup milk or yogurt (if needed, to thin the mixture): Useful for adjusting consistency so your pops pour easily into molds.
- Pinch of salt: Enhances all the flavors and brings out the natural sweetness.
- Optional toppings: granola, chocolate chips, shredded coconut, chopped nuts: Add crunch and texture for extra fun and flavor.
How to Make Frozen Yogurt Pops: The Ultimate Guide to Homemade Treats Recipe
Step 1: Prepare the Fruit
Start by washing and finely chopping your fresh fruit. If you’re using frozen fruit, there’s no need to thaw it—just use it straight from the freezer. For those who prefer a smoother texture, puree about half of the fruit before mixing. Combining both chopped and pureed pieces lends a wonderful blend of texture and flavor to your pops.
Step 2: Make the Yogurt Mixture
In a large mixing bowl, whisk together the Greek yogurt, honey or maple syrup, and vanilla extract if you’re using it. Mixing well ensures a smooth, luscious base that’s lightly sweetened and full of creamy goodness.
Step 3: Adjust Sweetness
Give your yogurt mixture a quick taste test. Depending on the sweetness of your chosen fruit and your personal preference, add a bit more honey or maple syrup until it’s just right for you. This step lets you customize your pops exactly how you like.
Step 4: Thin the Mixture (If Needed)
If your yogurt blend feels a bit too thick to pour nicely into molds, gently stir in milk or extra yogurt, a tablespoon at a time. The goal is a pourable but still creamy consistency that sets perfectly once frozen.
Step 5: Add Salt
A tiny pinch of salt goes a long way by deepening the overall flavor and enhancing the sweetness, tying all the ingredients together with a subtle savory note.
Step 6: Combine Fruit and Yogurt
Carefully fold your prepared fruit into the yogurt mixture. Doing this gently keeps the fruit pieces intact, distributing flavor beautifully without breaking everything down too much.
Step 7: Fill Popsicle Molds
Pour the mixture into your popsicle molds, leaving a little room at the top so the pops can expand as they freeze. This step shapes your future frozen treat and ensures each pop is packed with that creamy-fruity goodness.
Step 8: Add Toppings (Optional)
If you want to get creative, sprinkle crunchy granola, miniature chocolate chips, shredded coconut, or chopped nuts over the molds. These add delightful texture contrast and make your pops even more irresistible.
Step 9: Insert Popsicle Sticks
Pop those sticks right in the center of each mold, making sure they’re snug so you can hold your frozen treat with ease once frozen solid.
Step 10: Freeze
Place your molds in the freezer and let them chill for at least 4-6 hours, though overnight is best. This patience pays off with perfectly firm pops that hold their shape and offer an awesome bite.
Step 11: Remove from Molds
When you’re ready to enjoy, soften the popsicle molds by running them under warm water for just a few seconds. This quick tip helps you slide your Frozen Yogurt Pops: The Ultimate Guide to Homemade Treats Recipe free without any sticky fuss.
Step 12: Enjoy
Now comes the fun part—bite into your homemade creation! Serve immediately for the best texture or store extras in the freezer for another sunny day craving.
How to Serve Frozen Yogurt Pops: The Ultimate Guide to Homemade Treats Recipe
Garnishes
Freshly made Frozen Yogurt Pops taste delightful on their own, but adding a sprinkle of extra granola, a drizzle of honey, or even a few fresh fruit pieces right before serving adds that gourmet touch. These garnishes not only make your pops look stunning but add little flavor bursts with each bite.
Side Dishes
Pair these pops with a light summer salad or a crunchy nut mix for a balanced snack that satisfies multiple cravings. They also work wonderfully alongside a chilled fruit salad or a refreshing cucumber water for a full-on cooling experience.
Creative Ways to Present
Serve your frozen yogurt pops in colorful cups or on decorative boards surrounded by fresh fruit and edible flowers for a party-ready presentation. You can even dip the tips into melted dark chocolate and roll them in crushed nuts or coconut flakes for an extra-special treat that feels indulgent.
Make Ahead and Storage
Storing Leftovers
Keep any leftover Frozen Yogurt Pops stored in an airtight container or wrapped individually in the freezer. They maintain their best flavor and texture for about 3-4 days, so be sure to enjoy them within this timeframe for your ultimate refreshing snack.
Freezing
The beauty of this recipe is how perfectly it freezes. Once poured and prepared, your pops should be frozen solid for at least 4 hours, preferably overnight. Keeping them well-wrapped will prevent freezer burn and preserve their creamy texture and delicious flavors.
Reheating
Since these are frozen treats, reheating isn’t necessary or recommended. Instead, allow pops to soften just a bit at room temperature for 5 minutes before serving for the ideal creamy bite that melts slowly on your tongue.
FAQs
Can I use non-dairy yogurt for this recipe?
Absolutely! Plant-based yogurts like almond, coconut, or soy work wonderfully and keep these frozen yogurt pops just as creamy and delicious while catering to dietary preferences.
How sweet should my frozen yogurt mixture be?
This depends on your fruits and personal taste. Start with ½ cup of honey or maple syrup, then taste and add more if you prefer a sweeter pop. Remember, sweetness can mellow slightly once frozen.
Can I make these pops without popsicle molds?
If you don’t have molds, small cups with wooden sticks or toothpicks work just fine. Simply pour the mixture into cups and insert sticks before freezing as usual.
What kind of fruits are best for Frozen Yogurt Pops?
Bright, juicy fruits like berries, peaches, and mango shine best because they offer natural sweetness and colorful appeal. Try mixing different fruits for exciting flavor combos!
How long can I keep these frozen yogurt pops in the freezer?
For the best taste and texture, enjoy your pops within 3-4 days of freezing. Beyond that, ice crystals may form and slightly change the creamy texture.
Final Thoughts
There’s nothing quite like the joy of biting into a Homemade Frozen Yogurt Pop on a warm day, and now you have Frozen Yogurt Pops: The Ultimate Guide to Homemade Treats Recipe at your fingertips. It’s simple, customizable, and perfectly healthy enough to keep you coming back for more. So gather your favorite fruits, whip up this creamy delight, and treat yourself and your loved ones—you deserve every delicious bite!
“`
Print
Frozen Yogurt Pops: The Ultimate Guide to Homemade Treats Recipe
- Prep Time: 15 minutes
- Cook Time: 0 minutes
- Total Time: 4 hours 15 minutes
- Yield: 8 servings
- Category: Dessert
- Method: Freezing
- Cuisine: American
- Diet: Low Fat
Description
Discover how to make refreshing and healthy Frozen Yogurt Pops with simple ingredients like Greek yogurt, fresh or frozen fruit, and natural sweeteners. These homemade popsicles are perfect for a guilt-free treat on hot days, customizable with your favorite fruits and optional toppings for texture and flavor.
Ingredients
Frozen Yogurt Pops Ingredients
- 4 cups plain Greek yogurt (full-fat or non-fat)
- 1 cup fresh or frozen fruit (berries, mango, peaches, etc.)
- ½ cup honey or maple syrup (adjust to taste)
- 1 teaspoon vanilla extract (optional)
- ¼ cup milk or yogurt (if needed, to thin the mixture)
- Pinch of salt
Optional Toppings
- Granola
- Chocolate chips
- Shredded coconut
- Chopped nuts
Instructions
- Prepare the Fruit: Wash and chop fresh fruit into small pieces. If using frozen fruit, use directly from frozen. Puree half of the fruit for a smoother texture if desired. Combine all prepared fruit in a bowl.
- Make the Yogurt Mixture: In a large bowl, combine Greek yogurt, honey or maple syrup, and vanilla extract if using. Stir until smooth and well blended.
- Adjust Sweetness: Taste the mixture and add more honey or maple syrup until the desired sweetness is reached.
- Thin the Mixture (if needed): If the mixture is too thick to pour, add milk or yogurt one tablespoon at a time until it reaches a pourable consistency.
- Add Salt: Add a pinch of salt to the mixture to enhance and balance the sweetness.
- Combine Fruit and Yogurt: Gently fold the prepared fruit into the yogurt mixture, ensuring it is evenly distributed without breaking down the fruit too much.
- Fill Popsicle Molds: Pour the yogurt and fruit mixture into popsicle molds, leaving a small space at the top to allow for expansion during freezing.
- Add Toppings (optional): Sprinkle desired toppings like granola, chocolate chips, shredded coconut, or chopped nuts over the filled molds for added texture and flavor.
- Insert Popsicle Sticks: Place the popsicle sticks into the center of each mold carefully to keep them upright.
- Freeze: Place the molds in the freezer and freeze for at least 4 to 6 hours, preferably overnight, until completely frozen solid.
- Remove from Molds: To release the popsicles, run the molds under warm water for a few seconds to loosen them and then gently pull on the sticks to remove.
- Enjoy: Serve immediately or store frozen for later enjoyment.
Notes
- Use full-fat Greek yogurt for creamier pops or non-fat yogurt for a lighter version.
- Adjust sweetness based on the natural sweetness of the fruit used.
- Pureeing some fruit creates a smoother texture; leaving fruit chunkier adds more bite.
- Adding a small pinch of salt helps balance flavors and enhances sweetness.
- Experiment with different fruits and toppings to customize your frozen yogurt pops.
- Make sure to leave space at the top of the popsicle molds for expansion during freezing to avoid cracking.
