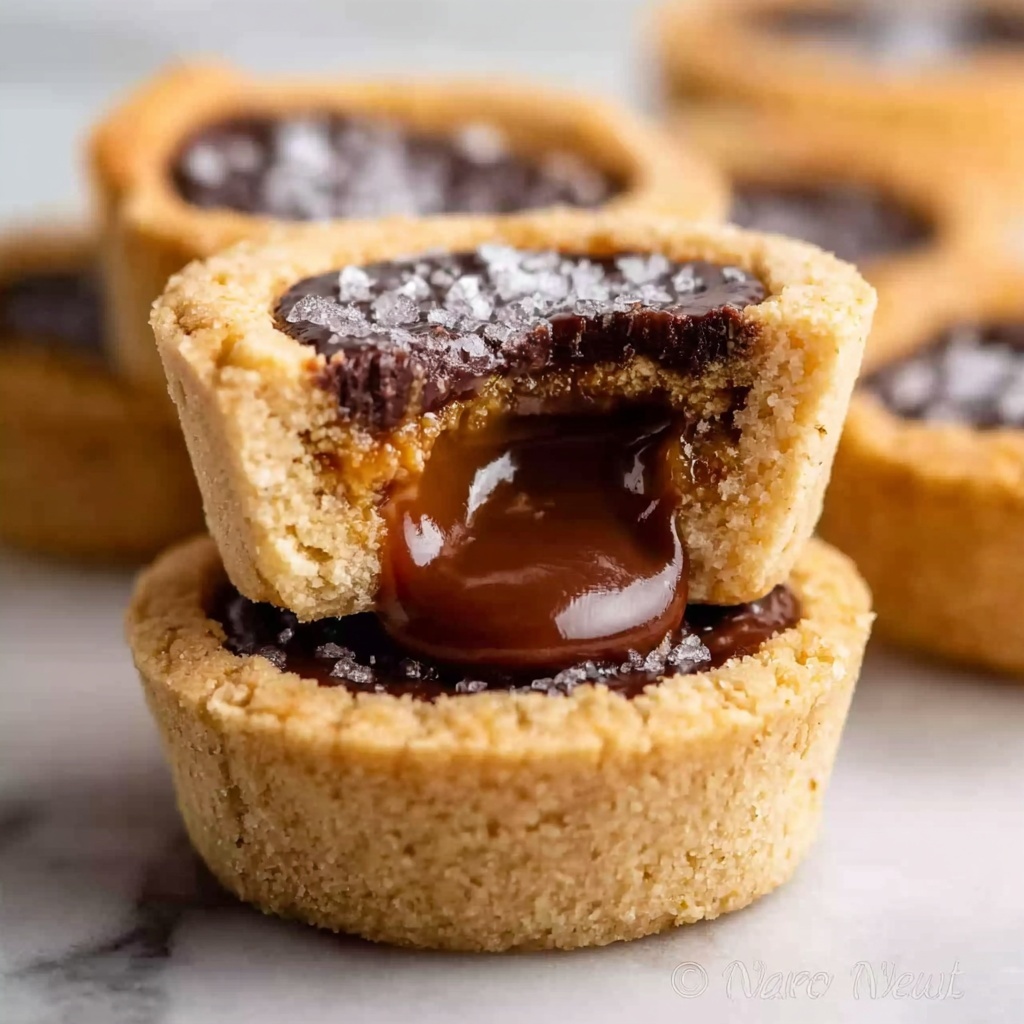
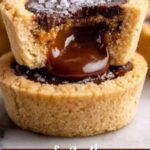
If you have a sweet tooth and love a fun twist on your favorite candy bar, then this Twix Cookie Cups Recipe is going to become your new obsession. Imagine a buttery cookie base molded like a tiny cup, filled with luscious caramel and topped with a shiny layer of melted chocolate—each bite delivering that perfect balance of chewy, gooey, and crunchy. It’s like capturing the magic of a Twix bar in a handheld dessert that’s perfect for sharing or indulging all by yourself.
Ingredients You’ll Need
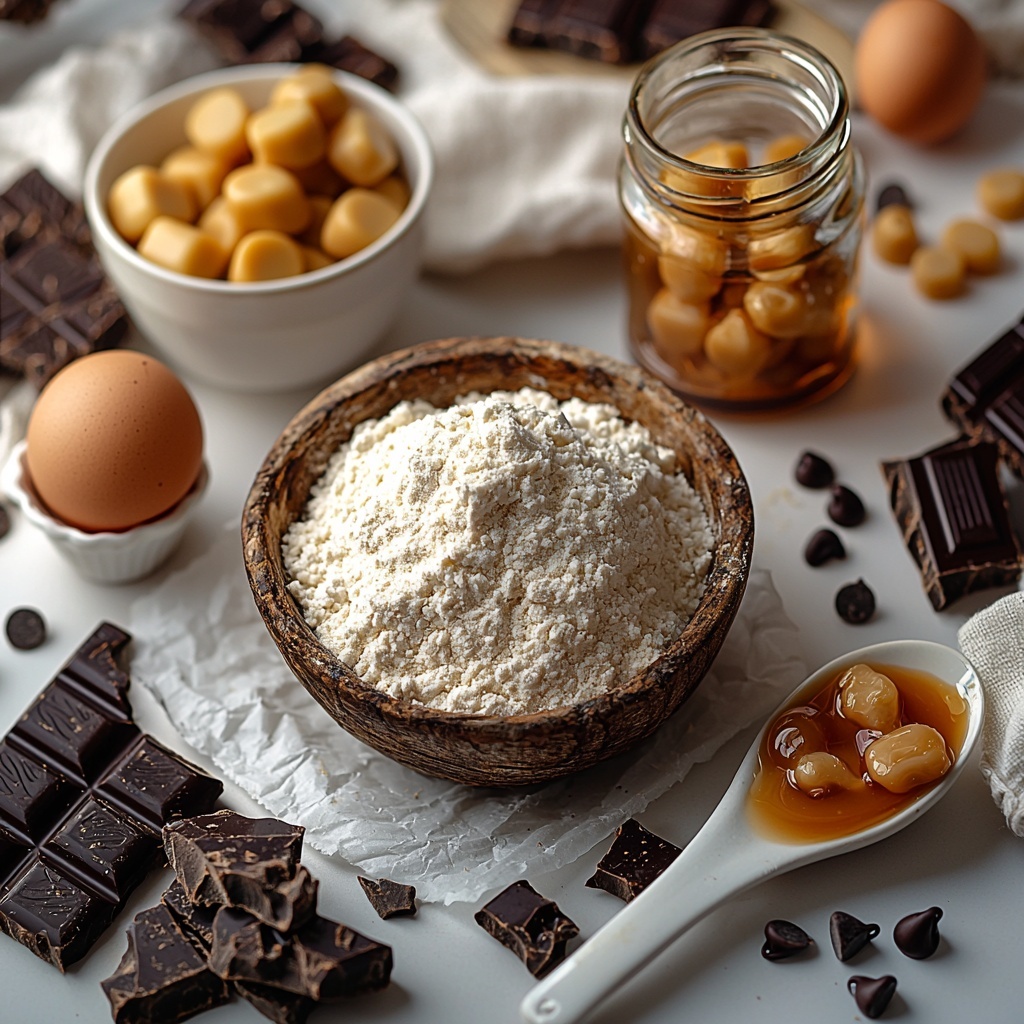
These ingredients are delightfully simple, but each one plays a crucial role in creating the texture and flavor that make Twix Cookie Cups so irresistible. From the tender cookie dough to the decadent caramel and smooth chocolate, every component adds something special.
- 1 cup All-Purpose Flour: This forms the sturdy base of your cookie cups, giving them the perfect structure to hold the fillings.
- 1/2 cup Butter, softened: Butter adds richness and a soft, tender crumb to the cookie dough.
- 1/2 cup Brown Sugar: Packed with molasses flavor, brown sugar brings moisture and a hint of caramel taste to your cookie shell.
- 1 large Egg: The egg binds everything together while adding just the right amount of lift.
- 1/4 teaspoon Salt: Salt enhances all the sweet flavors and balances the overall taste beautifully.
- 1 teaspoon Vanilla Extract: Vanilla adds warmth and depth, elevating the cookie base to incredible levels.
- Caramel Sauce or Soft Caramels (about 1 tablespoon per cup): This gooey layer is the heart of the Twix flavor profile, melting deliciously inside the cookie cup.
- Chocolate Chips or Chopped Chocolate (about 1 tablespoon per cup): Melting over the caramel, chocolate gives a glossy finish and rich, melt-in-your-mouth goodness.
How to Make Twix Cookie Cups Recipe
Step 1: Prepare the Cookie Dough
Start by creaming the softened butter with the brown sugar until your mixture is delightfully light and fluffy—this is where the cookie starts to get its tender texture. Next, beat in the egg and vanilla extract, combining everything thoroughly. Then, gradually stir in the all-purpose flour and salt, mixing just until you have a soft dough that feels pliable and easy to work with.
Step 2: Form the Cookie Cups
Grease your muffin tins well, then press the cookie dough evenly into each cup. Use your fingers or the back of a spoon to create a small well in the center of each dough cup, perfect for holding that luscious caramel and chocolate later. This shaping step is key to getting those gorgeous Twix-inspired cups.
Step 3: Bake the Cookie Shells
Pop your muffin tin into a preheated oven set to 350°F (175°C). Bake the cookie cups for 10 to 12 minutes, or until the edges start to take on a lovely light golden color. This gentle baking creates sturdy yet tender shells. When done, let them cool slightly but leave them inside the tin to keep their shape sturdy and waiting for the next step.
Step 4: Add the Caramel Layer
Once your cookie shells have cooled a bit, spoon about one tablespoon of caramel sauce or softened caramel candies into each cookie well. Gently press or spread the caramel to cover the base evenly, but be careful not to overflow the edges—this layer brings the classic Twix gooey goodness to your cookie cups.
Step 5: Top with Chocolate
Sprinkle chocolate chips or chopped chocolate right on top of the warm caramel. The heat from the caramel will help the chocolate soften and melt just enough for a beautiful, glossy finish that melts in your mouth. It’s this combination of gooey caramel softened by warm chocolate that makes these cookie cups irresistible.
Step 6: Chill and Set
Place the entire muffin tin in the refrigerator and chill for at least 30 minutes. This step allows the chocolate to harden to a perfect, slightly firm texture, while the caramel sets inside. Once the cups are set, gently remove them from the tin—your delicious Twix Cookie Cups are ready to be enjoyed!
How to Serve Twix Cookie Cups Recipe
Garnishes
You can keep it simple or dress these cookie cups up with a pinch of flaky sea salt for a mouthwatering contrast that intensifies the caramel’s sweetness. A small drizzle of extra caramel or melted chocolate makes an elegant finishing touch and adds an inviting shine.
Side Dishes
While these cookie cups stand beautifully on their own, pairing them with a scoop of vanilla ice cream or a dollop of whipped cream transforms them into an extraordinary dessert experience. Fresh berries alongside add a burst of freshness, balancing the sweetness nicely.
Creative Ways to Present
For parties or gifting, present your Twix Cookie Cups in pretty cupcake liners or a decorative box with parchment paper. You can even stack them on a tiered dessert tray at gatherings to make an eye-catching, delicious centerpiece everyone will be raving about.
Make Ahead and Storage
Storing Leftovers
If you happen to have any leftovers (though let’s be honest, that’s rare), keep your Twix Cookie Cups in an airtight container in the refrigerator. They’ll stay fresh and delicious for 3-4 days, so you can enjoy that gooey caramel and chocolate goodness a little longer.
Freezing
You can freeze these cookie cups for longer storage by placing them in a single layer on a baking sheet to freeze initially, then transferring them to a sealed freezer-safe container or bag. They keep well for up to one month. Thaw overnight in the fridge before enjoying.
Reheating
To bring back their fresh-baked charm, gently warm your Twix Cookie Cups in the microwave for about 10 seconds or in a low oven for a few minutes. This melt-in-your-mouth warmth revives the gooey caramel and soft cookie texture perfectly.
FAQs
Can I use store-bought cookie dough to save time?
Absolutely! While homemade dough gives you that fresh buttery flavor, using quality store-bought cookie dough works well too—just make sure to press it firmly in your muffin tin and create the wells for the caramel and chocolate layers.
What type of caramel works best?
The best caramel for Twix Cookie Cups is soft caramel candies that melt easily or a silky caramel sauce. Hard candies won’t soften enough during baking and can make the centers too firm.
Can I substitute chocolate chips with another type of chocolate?
Yes! Chopped chocolate bars, white chocolate, or even peanut butter chips can be used depending on your flavor preference. Just adjust the quantity accordingly to cover the caramel layer evenly.
Is it necessary to chill the cookie cups before serving?
Chilling is important because it helps the chocolate set firmly on top and the caramel hold its shape. If you skip chilling, the cups may be too soft and sticky to handle easily.
How do I prevent the cookie cups from sticking to the muffin tin?
Greasing your muffin tin thoroughly or using non-stick spray helps prevent sticking. For extra ease, consider lining the tin with silicone cupcake liners that can be peeled away easily.
Final Thoughts
Making these Twix Cookie Cups Recipe at home is such a rewarding treat—you get that homemade touch with the charm of a candy bar you already love. Whether for a party, a cozy night in, or a fun baking project, these cookie cups are sure to bring smiles and satisfy any sweet craving. Give them a try; I promise they’ll become one of your favorite desserts to bake and share!
Print
Twix Cookie Cups Recipe
- Prep Time: 20 minutes
- Cook Time: 12 minutes
- Total Time: 1 hour
- Yield: 12 servings
- Category: Dessert
- Method: Baking
- Cuisine: American
Description
Delightful Twix Cookie Cups featuring a buttery cookie base filled with caramel and topped with melted chocolate. These bite-sized treats combine the classic flavors of Twix candy bars into an easy-to-make dessert perfect for parties or snacking.
Ingredients
Cookie Dough
- 1 cup All-Purpose Flour
- 1/2 cup Butter, softened
- 1/2 cup Brown Sugar
- 1 large Egg
- 1/4 teaspoon Salt
- 1 teaspoon Vanilla Extract
Filling
- Caramel Sauce or Soft Caramels (about 1 tablespoon per cup)
- Chocolate Chips or Chopped Chocolate (about 1 tablespoon per cup)
Instructions
- Prepare the Cookie Dough: Cream the softened butter and brown sugar together until light and fluffy. Mix in the egg and vanilla extract until fully incorporated. Gradually add the all-purpose flour and salt, stirring continuously until a soft dough forms.
- Form the Cookie Cups: Grease a muffin tin and evenly press the cookie dough into each cup, creating small wells in the center to hold the caramel and chocolate layers.
- Bake the Cookie Shells: Preheat the oven to 350°F (175°C). Bake the cookie cups for 10 to 12 minutes or until the edges are lightly golden. Remove from the oven and allow them to cool slightly while still in the muffin tin.
- Add the Caramel Layer: Place about 1 tablespoon of caramel sauce or softened caramel candies into each cookie well. Gently press to spread the caramel evenly without spilling over the edges.
- Top with Chocolate: Sprinkle chocolate chips or chopped chocolate over the warm caramel layer, allowing it to melt slightly and create a smooth, glossy topping.
- Chill and Set: Refrigerate the muffin tin for at least 30 minutes to let the chocolate harden. Carefully remove the Twix Cookie Cups from the tin and serve.
Notes
- Butter should be softened to room temperature to ease creaming with sugar.
- You can substitute caramel sauce with wrapped soft caramels melted gently.
- Cooling the cookie cups slightly before adding caramel prevents the caramel from melting excessively.
- Chilling is essential to help the chocolate topping set firmly.
- Store leftover cookie cups in an airtight container in the refrigerator for up to 5 days.

