“`html
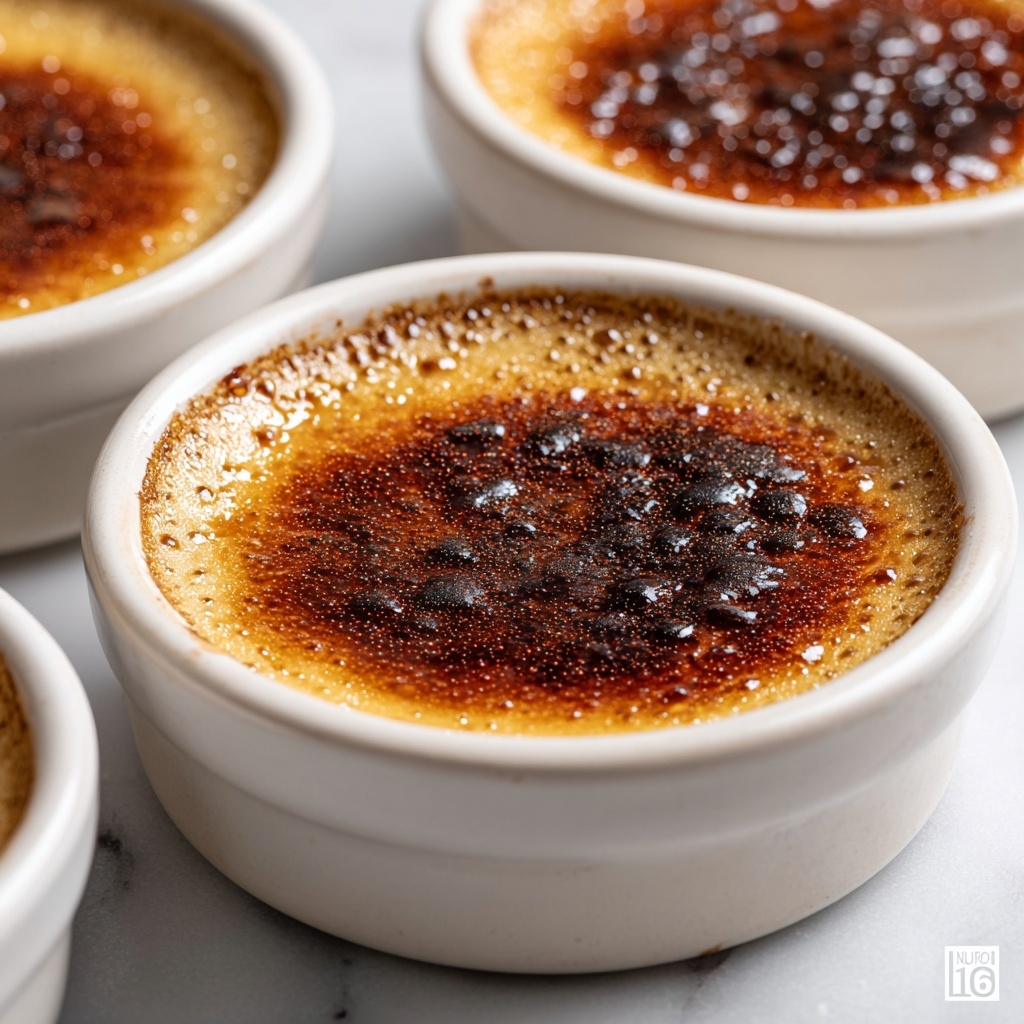
If you have a soft spot for desserts that feel indulgent yet are surprisingly simple to make, you are going to fall head over heels for this Easy Crème Brûlée Recipe. Imagine a silky smooth custard with just the right hint of vanilla, crowned with a perfectly crisp, caramelized sugar crust that cracks under your spoon—pure magic in every bite. This classic French dessert is actually quite approachable, and I’m thrilled to share how you can create this restaurant-worthy treat right in your own kitchen. Get ready to wow your taste buds and impress anyone lucky enough to share this with you!
Ingredients You’ll Need
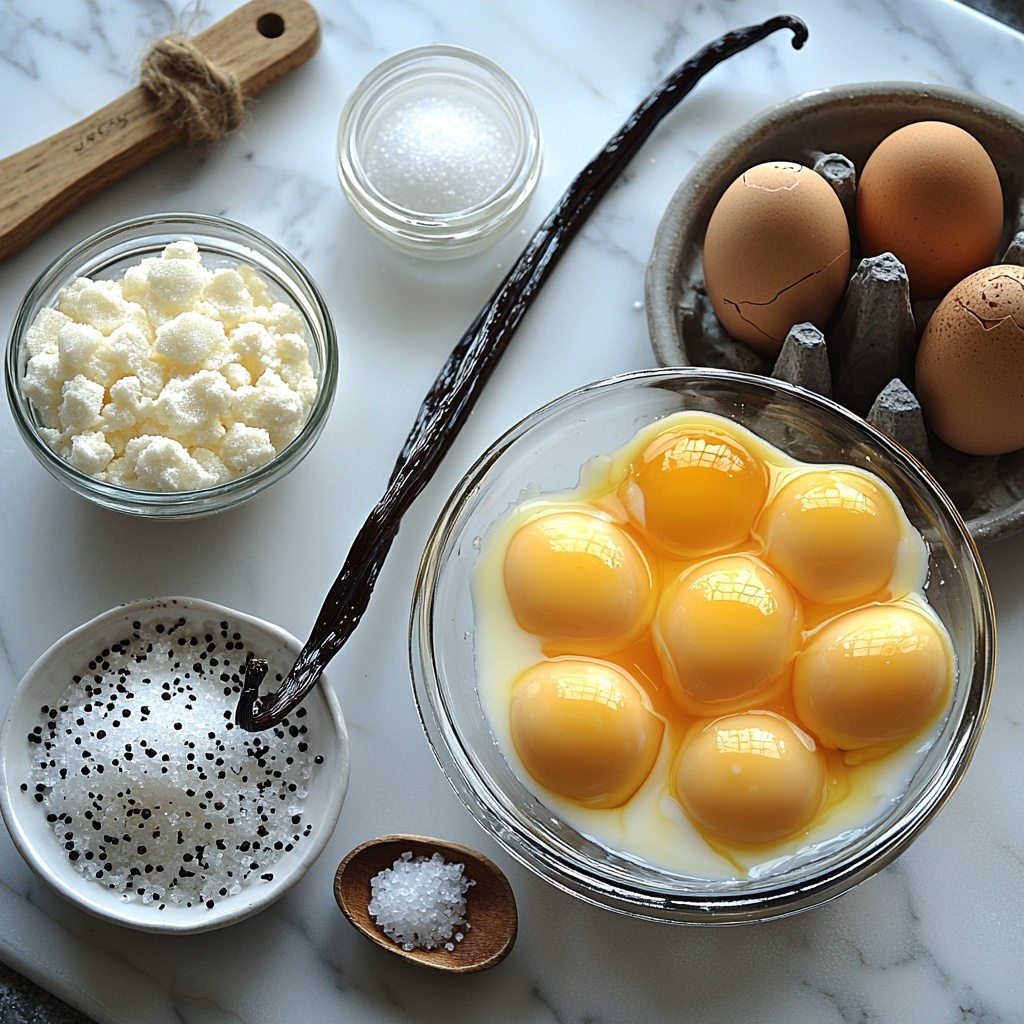
Every ingredient in this Easy Crème Brûlée Recipe plays a starring role, from the rich heavy cream to the fragrant vanilla, creating a dessert that is creamy and luscious with a crisp sugar topping. These essentials come together effortlessly to deliver that perfect harmony of texture and flavor you crave.
- 2 cups heavy cream: The foundation for a luxuriously rich and velvety custard.
- 1 vanilla bean (or 1 tablespoon vanilla extract): Adds warm, aromatic sweetness; using a bean gives an extra depth of flavor and those beautiful black specks.
- 5 large egg yolks: They provide richness and help the custard set silky smooth without curdling.
- 1/2 cup granulated sugar (plus extra for caramelizing): Sweetens the dessert just right and creates the iconic crackling topping.
- Pinch of salt: Balances the sweetness and enhances all the flavors beautifully.
How to Make Easy Crème Brûlée Recipe
Step 1: Preheat and Prepare
Start by preheating your oven to 325°F (160°C). Have 4 to 6 ramekins ready depending on their size—these little dishes are perfect for individual portions and help the custard bake evenly.
Step 2: Infuse the Cream
Pour the heavy cream into a medium saucepan. If you’re using a vanilla bean, split it lengthwise and scrape out the seeds directly into the cream, adding the pod too for maximum flavor infusion. Heat the cream on medium until it just starts to simmer—watch carefully so it doesn’t boil, and stir occasionally to keep it from scorching.
Step 3: Whisk Egg Yolks and Sugar
While the cream gently heats, whisk together egg yolks, granulated sugar, and a pinch of salt in a bowl until the mixture is smooth and turns a pale yellow. This process brings air into the custard, giving it a delightfully smooth texture.
Step 4: Temper the Eggs
This is a crucial step to avoid scrambled eggs in your custard. Slowly drizzle a small amount of the hot cream into the egg yolk mixture while whisking constantly. Then gradually add the rest of the cream, continuing to whisk to combine everything evenly and gently.
Step 5: Strain and Pour
If you used a vanilla bean, remove the pod and strain the entire custard mixture through a fine-mesh sieve into another bowl to catch any solid bits. Pour the smooth mixture evenly into your ramekins, filling them almost to the top but leaving a little room for the sugar crust.
Step 6: Bake in a Water Bath
Place the ramekins in a large baking dish and carefully pour hot water halfway up the sides of the ramekins. This water bath ensures gentle, even cooking for a silky custard. Bake for 30 to 40 minutes—you’re looking for custards that are just set with a slight wobble in the center.
Step 7: Cool and Chill
Remove the ramekins from the water bath and allow them to come to room temperature. Then cover and refrigerate for at least 2 hours or overnight. This chilling step is key to developing the right texture and making the custard firm enough for that crackly topping.
Step 8: Caramelize the Sugar
Right before serving, sprinkle a thin, even layer of granulated sugar on top of each custard. Use a kitchen torch to carefully melt and caramelize the sugar into a golden brown crust. If you don’t have a torch, placing the ramekins under a broiler for 1-2 minutes works too—just watch closely to avoid burning.
How to Serve Easy Crème Brûlée Recipe
Garnishes
While the classic crème brûlée needs nothing beyond its glorious caramelized sugar top, feel free to elevate your presentation with fresh berries, a sprig of mint, or even a dusting of powdered sugar around the rim for an elegant touch that adds a pop of color and freshness.
Side Dishes
This dessert shines brightest when it stands alone, but light accompaniments like a crisp biscotti or a delicate shortbread cookie can complement the creamy custard without overpowering it. Alternatively, a fresh fruit salad with citrus notes can provide a refreshing contrast.
Creative Ways to Present
For a fun twist, serve your crème brûlée in mini mason jars or quirky cups for a rustic vibe. You can also experiment with flavored sugar toppings—try cinnamon sugar or a sprinkle of espresso powder before torching for unique variations that still honor the classic essence.
Make Ahead and Storage
Storing Leftovers
Once fully chilled, crème brûlée keeps wonderfully in the refrigerator for up to 3-4 days. Make sure to cover the ramekins tightly with plastic wrap to protect the custard from absorbing other fridge aromas and to maintain its creamy texture.
Freezing
Because crème brûlée relies on a delicate texture, freezing is not recommended as it can cause the custard to separate and become grainy when thawed. It’s best enjoyed fresh or refrigerated for a few days.
Reheating
If you want to warm your crème brûlée slightly before caramelizing the sugar, bring it to room temperature from the fridge and allow it to sit out for about 15 minutes. Avoid microwaving as it can disrupt the custard’s texture.
FAQs
Can I use vanilla extract instead of a vanilla bean?
Absolutely! If you don’t have a vanilla bean on hand, 1 tablespoon of vanilla extract will work beautifully. Just add it after heating the cream to preserve its flavor. The custard will still be rich and fragrant.
What if I don’t have a kitchen torch?
No worries! You can place the ramekins under your oven’s broiler for 1 to 2 minutes to caramelize the sugar. Keep a very close eye to prevent burning—rotate the ramekins as needed for even browning.
Why does the custard need a water bath?
The water bath allows for gentle, even cooking by surrounding the ramekins with moist heat. This technique prevents the eggs from scrambling and helps achieve the custard’s famously smooth texture.
Can I make crème brûlée ahead of time?
Yes! In fact, making it a day before serving is ideal as it gives the custard time to set perfectly. Just keep the custards covered and refrigerated after baking, and caramelize the sugar just before serving.
How do I know when the custard is done baking?
The custard is ready when it is mostly set but still has a slight jiggle in the center. It will firm up fully as it cools in the fridge. Overbaking leads to curdling, so err on the side of gentle doneness.
Final Thoughts
Making this Easy Crème Brûlée Recipe is like opening a little door to haute cuisine right in your kitchen—simple ingredients, straightforward steps, and a spectacular result. I encourage you to give it a try; the joy of cracking that caramelized sugar topping and savoring the creamy custard underneath is truly unmatched. Whether for a special occasion or a cozy night in, this dessert will instantly elevate your table and your mood!
“`
Print
Easy Crème Brûlée Recipe
- Prep Time: 15 minutes
- Cook Time: 35 minutes
- Total Time: 2 hours 50 minutes
- Yield: 4-6 servings
- Category: Dessert
- Method: Baking
- Cuisine: French
Description
This easy Crème Brûlée recipe guides you through creating a classic French dessert featuring a creamy vanilla custard base topped with a perfectly caramelized sugar crust. The custard is gently baked in a water bath to ensure a smooth, silky texture, then chilled and finished with a crisp layer of brûléed sugar for a delightful contrast of textures.
Ingredients
Custard
- 2 cups heavy cream
- 1 vanilla bean (or 1 tablespoon vanilla extract)
- 5 large egg yolks
- 1/2 cup granulated sugar (plus extra for caramelizing)
- Pinch of salt
Instructions
- Preheat Oven: Preheat your oven to 325°F (160°C). Prepare 4-6 ramekins depending on their size, setting them aside for the custard.
- Heat the Cream: Pour the heavy cream into a medium saucepan. If using a vanilla bean, split it lengthwise and scrape the seeds into the cream, adding the pod as well. Heat the cream over medium heat, stirring occasionally to prevent scorching, until it starts to simmer but does not boil. If using vanilla extract, wait to add it later.
- Whisk Egg Yolks: In a separate bowl, whisk together the egg yolks, 1/2 cup granulated sugar, and a pinch of salt until the mixture is smooth and pale yellow in color.
- Temper the Eggs: Slowly pour a small amount of the hot cream into the egg yolk mixture, whisking constantly to avoid cooking the eggs. Gradually add the remaining cream while continuing to whisk to fully combine.
- Strain the Mixture: Remove the vanilla pod from the cream if used. Strain the custard through a fine mesh sieve into another bowl to catch any lumps or residual bits from the vanilla pod or eggs.
- Pour into Ramekins: Evenly divide the custard mixture among the prepared ramekins, filling them nearly to the top.
- Bake: Place the ramekins inside a large baking dish. Pour hot water into this dish to reach halfway up the sides of the ramekins to create a water bath. Bake in the preheated oven for 30 to 40 minutes, or until the custard is just set and slightly wobbly in the center.
- Cool: Carefully remove the ramekins from the water bath and allow them to cool to room temperature. Then refrigerate for at least two hours or overnight to allow the custard to fully set.
- Caramelize the Sugar: Sprinkle a thin, even layer of granulated sugar over the surface of each custard. Using a kitchen torch, caramelize the sugar by moving the flame in circular motions until it melts and turns golden brown. Alternatively, place the ramekins under a broiler for 1-2 minutes while watching carefully to prevent burning.
- Serve: Let the caramelized sugar cool and harden for a minute or two before serving to enjoy the signature crispy crust atop the silky custard.
Notes
- A water bath is essential for even cooking and preventing the custard from cracking.
- If you do not have a kitchen torch, the broiler method works but requires close attention to avoid burning.
- Vanilla bean provides the richest flavor, but vanilla extract is a convenient substitute.
- Custards can be prepared a day ahead and refrigerated, making this a great make-ahead dessert.


