
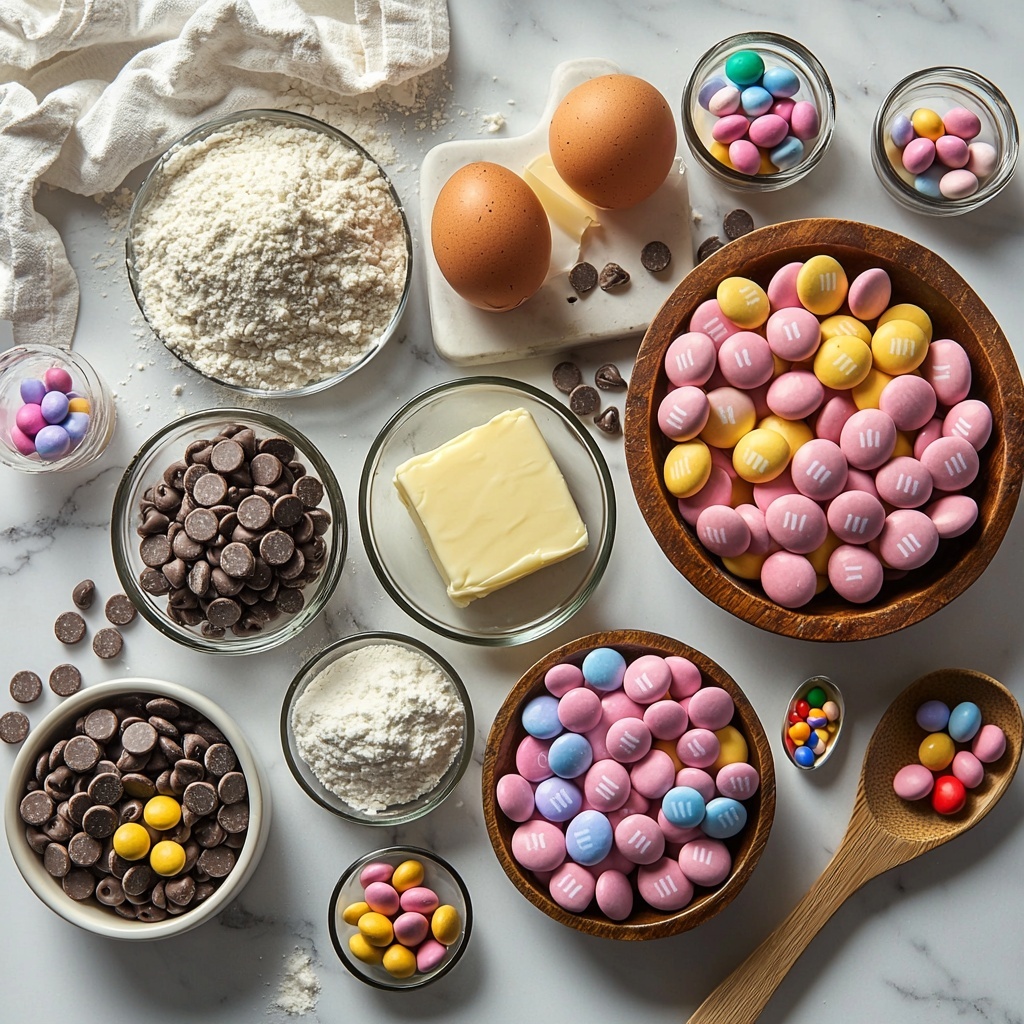
If you’re looking to brighten up your Easter celebrations with a treat that’s as delightful to look at as it is to eat, the Colorful Easter-Themed Marbled Chocolate Chip Cookies Recipe is your perfect match. These cookies combine the classic comfort of chocolate chips with the festive fun of pastel marbled dough and cheerful Easter-themed M&Ms, creating a cookie that’s joyous, vibrant, and irresistibly delicious. Whether you’re baking with kids or preparing a festive platter for your guests, these cookies bring a splash of color and a lot of smiles to any table.
Ingredients You’ll Need
These ingredients are wonderfully simple yet thoughtfully selected to ensure every bite is tender, flavorful, and packed with festive charm. From the rich butter that gives the cookies their softness to the pastel gel food coloring that transforms the dough into a visual celebration, each component plays a starring role.
- 2 ½ cups all-purpose flour: Provides the perfect structure for soft, chewy cookies.
- 1 teaspoon baking soda: Helps the cookies rise just enough for that delightful texture.
- ½ teaspoon salt: Balances sweetness and enhances other flavors.
- 1 cup unsalted butter, softened: Adds richness and moisture for tender bites.
- ¾ cup granulated sugar: Offers crispness and sweetness for contrast.
- ¾ cup packed brown sugar: Contributes a deep caramel note and chewy texture.
- 2 large eggs: Bind everything together and add moisture.
- 2 teaspoons vanilla extract: Brings a warm, inviting sweetness.
- 1 ½ cups semi-sweet chocolate chips: The classic chocolatey melty goodness we all crave.
- 1 cup Easter-themed M&Ms, plus extra for topping: Adds festive color and crunchy candy pops.
- Gel food coloring (pastel pink, purple, yellow, and blue): Creates the vibrant marbled effect perfect for Easter.
How to Make Colorful Easter-Themed Marbled Chocolate Chip Cookies Recipe
Step 1: Prepare the Base Dough
Start by whisking together the all-purpose flour, baking soda, and salt in a medium bowl. Setting this aside ensures your dry ingredients are evenly mixed and ready to blend smoothly with the wet ingredients, which is key for achieving consistent texture in your cookies.
Step 2: Cream the Butter and Sugars
Using an electric mixer, cream together the softened butter, granulated sugar, and brown sugar until the mixture is light and fluffy. This process is crucial for aerating the dough, resulting in cookies that are soft on the inside yet with just a hint of crispness on the edges.
Step 3: Add Eggs and Vanilla
Incorporate the eggs one at a time, mixing well after each addition. Then, stir in the vanilla extract to infuse the dough with that irresistible sweet aroma and flavor.
Step 4: Combine Wet and Dry Ingredients
Gradually add the flour mixture to the wet ingredients, mixing on low speed and being careful not to overmix. Overworking the dough can make the cookies tough, so aim just to combine until no flour pockets remain.
Step 5: Fold in Chocolate Chips and Easter M&Ms
Gently fold in the chocolate chips and colorful Easter-themed M&Ms, making sure they’re evenly distributed throughout the dough for bursts of sweetness and fun color in every bite.
Step 6: Divide and Color the Dough
Divide the dough into four equal portions. Tint each with a different pastel gel food coloring—pink, purple, yellow, and blue—mixing gently until the color is vivid and uniformly blended. These delicate hues will form the signature marbled appearance of the cookies.
Step 7: Create the Marbled Effect
Take small amounts from each colored dough and press them together lightly without overmixing. This approach creates a beautiful marbled effect rather than a uniform color, giving each cookie its own unique swirl of color that’s so festive and eye-catching.
Step 8: Shape and Chill
Roll the marbled portions into balls about 2 tablespoons each, place them on a parchment-lined baking sheet spaced about 2 inches apart, and gently press a few extra M&Ms on top for a vibrant finish. Cover the tray with plastic wrap and refrigerate for at least 30 minutes. Chilling firms up the dough, helping the cookies maintain their shape during baking.
Step 9: Bake to Perfection
Preheat the oven to 350°F (175°C). Bake the chilled dough balls for 10-12 minutes until the edges are set and lightly golden. The centers might look slightly underbaked but will firm up beautifully as they cool, giving you that irresistibly soft and chewy center everyone loves.
Step 10: Cool and Enjoy
Allow the cookies to cool on the baking sheet for about 5 minutes, then transfer them to a wire rack to cool completely. This step lets the cookies set fully while keeping their moist texture intact.
How to Serve Colorful Easter-Themed Marbled Chocolate Chip Cookies Recipe
Garnishes
For an extra festive touch, sprinkle a few pastel sugar crystals or tiny edible flower petals atop the cookies just before serving. This little detail adds sparkle and elegance, making these cookies perfect for a holiday brunch or dessert table centerpiece.
Side Dishes
Pair these marbled cookies with a creamy vanilla milkshake, a vibrant fruit salad, or a cup of spiced chai tea for an indulgent afternoon treat. The cookies’ sweetness and playful colors complement cool and warm beverages alike, making snack time feel like a special celebration.
Creative Ways to Present
Arrange your Colorful Easter-Themed Marbled Chocolate Chip Cookies Recipe on a decorative platter lined with fresh spring flowers or pastel-colored doilies to highlight their festive vibe. For a charming gift idea, stack several cookies in a clear cellophane bag tied with a pastel ribbon—it’s a homemade delight anyone would cherish.
Make Ahead and Storage
Storing Leftovers
Once baked and cooled, store your cookies in an airtight container at room temperature to keep them soft and fresh. Properly stored, they will stay delicious for 3-4 days, making them a convenient treat to enjoy throughout your Easter weekend.
Freezing
If you want to prepare ahead or save some for later, the dough balls can be frozen before baking. Place them on a parchment-lined tray, freeze until solid, then transfer to a freezer-safe container. You can also freeze baked cookies, wrapped tightly in plastic wrap and stored in a sealed bag, for up to 3 months.
Reheating
To revive frozen baked cookies, let them thaw at room temperature and warm briefly in a preheated oven at 300°F (150°C) for 5 minutes. This gentle heat refreshes their softness and brings back that freshly baked aroma we all adore.
FAQs
Can I use regular food coloring instead of gel?
While regular liquid food coloring will work, gel food coloring is recommended here because it produces more vibrant pastel shades without altering the dough’s consistency. Using gels means you need less color to achieve those bright Easter hues.
What if I don’t have Easter-themed M&Ms?
No worries! You can substitute with regular M&Ms or any small colorful candies to maintain that festive sparkle and crunch. Alternatively, colorful sprinkles or candy-coated chocolate chips can work beautifully too.
Can I make these cookies gluten-free?
Yes, by swapping the all-purpose flour for a gluten-free baking blend designed for cookies, you can create a delightful gluten-free version. Just be sure to check that your baking soda and other ingredients are gluten-free as well.
How can I ensure the marbled dough doesn’t fully mix?
When combining the colored dough portions, gently press them together without kneading or swirling too vigorously. This light touch lets the colors swirl naturally, creating that perfect marbled effect without blending into a single color.
Are these cookies suitable for freezing after baking?
Absolutely! Once baked and cooled, these cookies freeze wonderfully. Just wrap them securely to protect them from freezer burn and enjoy a festive treat anytime you crave a sweet, colorful pick-me-up.
Final Thoughts
There’s something truly uplifting about baking and sharing the Colorful Easter-Themed Marbled Chocolate Chip Cookies Recipe—it’s like bringing a burst of springtime joy into your kitchen. These cookies are as fun to make as they are to eat, combining classic flavors with delightful visuals that celebrate the season. I encourage you to give this recipe a try, and watch how these pretty cookies become an instant favorite at your Easter gatherings, spreading sweetness and smiles all around.
Print
Colorful Easter-Themed Marbled Chocolate Chip Cookies Recipe
- Prep Time: 15 minutes
- Cook Time: 12 minutes
- Total Time: 27 minutes
- Yield: 24 servings
- Category: Dessert
- Method: Baking
- Cuisine: American
Description
Delight in these festive Easter-themed Chocolate Chip Cookies featuring a colorful marbled dough with semi-sweet chocolate chips and vibrant M&Ms. Soft, chewy, and bursting with pastel hues, these homemade cookies are perfect for holiday celebrations or any occasion needing a sweet, colorful treat.
Ingredients
Dry Ingredients
- 2 ½ cups all-purpose flour
- 1 teaspoon baking soda
- ½ teaspoon salt
Wet Ingredients
- 1 cup unsalted butter, softened
- ¾ cup granulated sugar
- ¾ cup packed brown sugar
- 2 large eggs
- 2 teaspoons vanilla extract
Add-ins and Coloring
- 1 ½ cups semi-sweet chocolate chips
- 1 cup Easter-themed M&Ms, plus extra for topping
- Gel food coloring (pastel pink, purple, yellow, and blue)
Instructions
- Prepare the Dough: In a medium bowl, whisk together the flour, baking soda, and salt. Set this dry mix aside for later use.
- Cream Butter and Sugars: In a large mixing bowl, use an electric mixer to cream the softened butter with granulated and brown sugars until the mixture is light and fluffy, ensuring a smooth base dough.
- Add Eggs: Incorporate the eggs one at a time into the creamed mixture, beating well after each addition to maintain a consistent texture.
- Mix in Vanilla: Add the vanilla extract and blend thoroughly until fully combined with the wet ingredients.
- Combine Dry and Wet Ingredients: Gradually add the reserved dry ingredient mixture to the wet mixture on low speed, mixing just until combined to avoid overworking the dough.
- Fold in Chocolate Chips and M&Ms: Gently fold the semi-sweet chocolate chips and the Easter-themed M&Ms into the dough to evenly distribute the sweet chips and candy pieces.
- Divide and Color the Dough: Split the dough into four equal portions and tint each with a different pastel gel food coloring (pink, purple, yellow, and blue), mixing gently until the color is uniformly blended.
- Shape the Cookies: Take small portions from each colored dough and press them together lightly to create a marbled effect without fully mixing the colors. Roll these marbled portions into approximately 2-tablespoon balls.
- Arrange and Top: Place the dough balls on a parchment-lined baking sheet, spacing them about 2 inches apart. Press a few extra M&Ms on top of each dough ball to enhance the festive look.
- Chill the Dough: Cover the baking sheet with plastic wrap and refrigerate for at least 30 minutes to firm the dough, helping the cookies hold their shape during baking.
- Preheat Oven: Preheat your oven to 350°F (175°C) to prepare for baking.
- Bake the Cookies: Place the chilled dough balls in the oven and bake for 10-12 minutes until the edges are set and slightly golden, keeping in mind the centers may look underbaked but will firm up as they cool.
- Cool the Cookies: Allow the cookies to cool on the baking sheet for about 5 minutes before transferring them to a wire rack to cool completely, ensuring a soft and chewy texture.
Notes
- Using gel food coloring helps achieve vibrant pastel colors without altering dough consistency.
- Chilling the dough is important to prevent excessive spreading and maintain the marbled look.
- For softer cookies, avoid overbaking and check for golden edges rather than fully firm centers.
- Extra M&Ms on top enhance visual appeal and add bursts of candy flavor.
- Store cookies in an airtight container at room temperature for up to one week.


