“`html
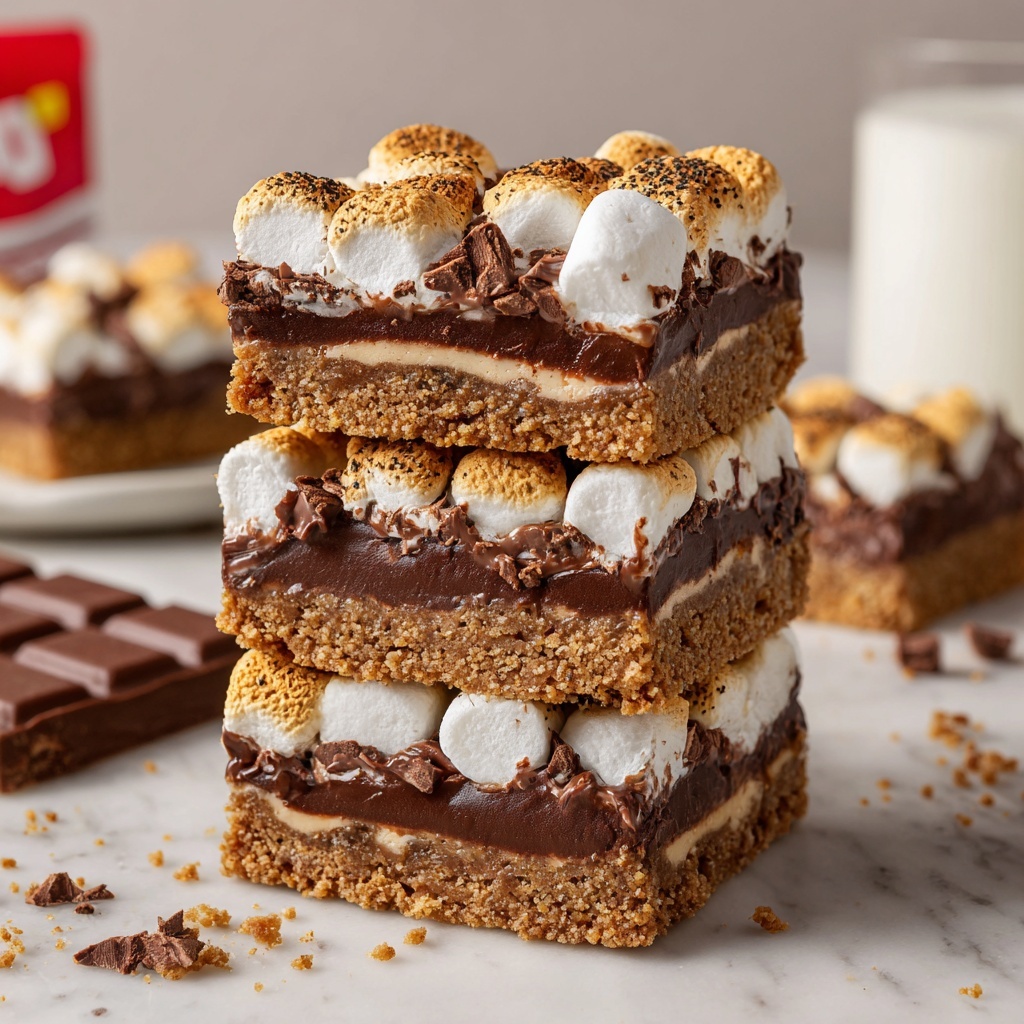
If you have a sweet tooth that craves something nostalgic yet delightfully gooey, this S’mores Bar Recipe is your new best friend in the kitchen. It takes all the beloved flavors of traditional campfire s’mores—the crunch of graham crackers, the smooth melt of chocolate, and the toasted fluffiness of marshmallows—and transforms them into a luscious, shareable bar that’s perfect for any gathering or cozy night in. Trust me, once you make these bars, you’ll want to whip them up again and again!
Ingredients You’ll Need
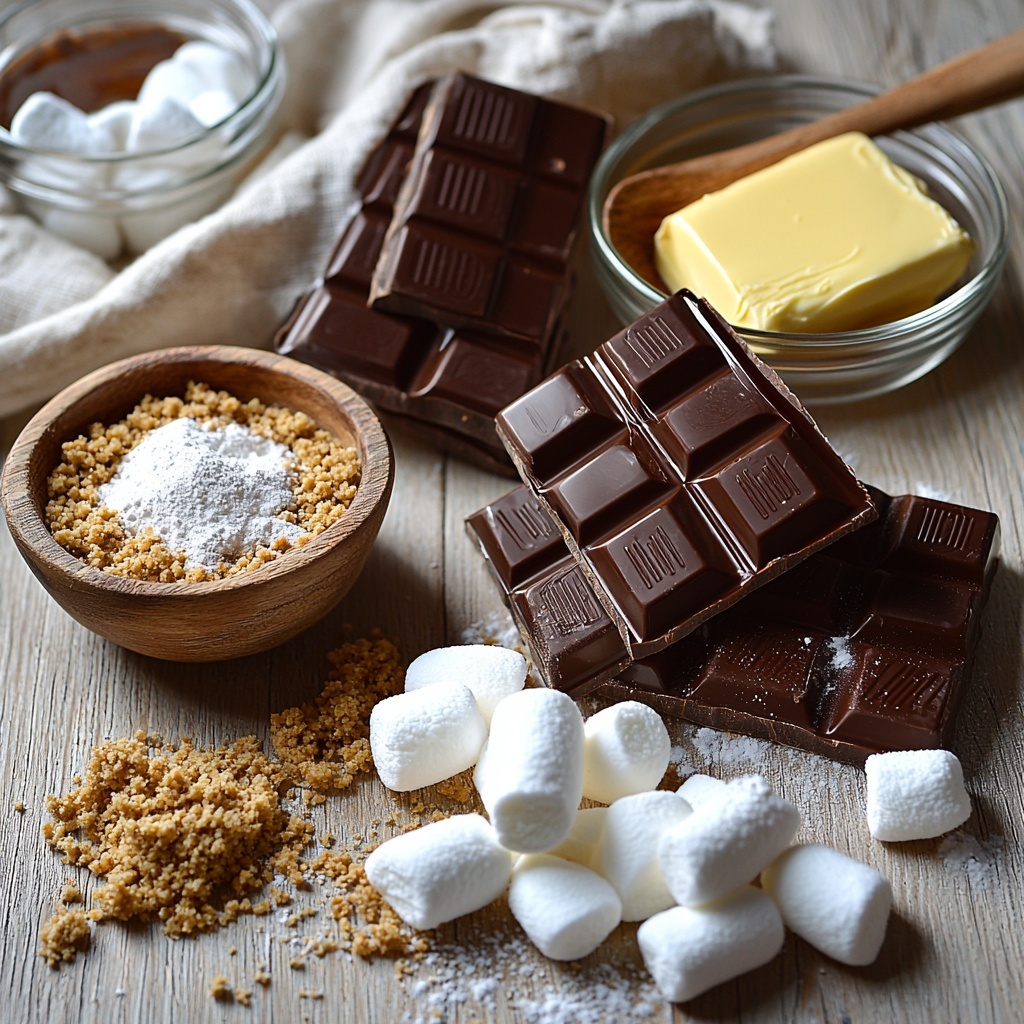
Gathering the right ingredients for this S’mores Bar Recipe proves how simple, yet essential, each component is in building those classic layers of flavor and texture. Every item plays a key role in balancing crispness, sweetness, and that oh-so-important melty factor.
- 2 Cups graham cracker crumbs: Provides the crunchy, slightly sweet base that holds the bars together.
- 8-12 Tablespoons butter (melted): Binds the crumbs while adding richness and a tender texture to the crust.
- 1/2 Cup powdered sugar: Adds a touch of sweetness and helps the crust to form more solidly.
- 4 Hershey Chocolate Bars (4.4 ounce each): Classic milk chocolate that melts perfectly to form that luscious middle layer.
- 1 package mini marshmallows: Creates the delightful toasted topping that’s soft, golden, and irresistible.
How to Make S’mores Bar Recipe
Step 1: Preheat and Prepare the Pan
Start off by preheating your oven to 350 degrees Fahrenheit and gently grease a 9×13 baking pan with non-stick butter spray. This ensures your bars will come out cleanly without sticking, making clean-up a breeze and keeping your crust intact.
Step 2: Mix the Crust
In a medium bowl, combine the graham cracker crumbs, powdered sugar, and the melted butter. Stir it well until the mixture is evenly moistened. This simple blend is crucial because it forms the solid yet crumbly base that supports the layers to come.
Step 3: Press and Bake the Crust
Press the crumb mixture firmly and evenly into the bottom and slightly up the sides of your prepared pan. Using your fingers to pack it down ensures a tight crust that won’t crumble apart. Bake this for about 5 to 8 minutes, just until the edges start to turn a lovely golden brown. Remember, the crust will firm up more as it cools, so don’t worry if it’s soft straight out of the oven!
Step 4: Cool and Layer the Chocolate
Once baked, remove the crust from the oven and let it cool slightly. Then, place the Hershey’s chocolate bars in a layer over the crust, making sure to cover it completely. Pop the pan back into the oven for 3 minutes until the chocolate begins to melt and looks shiny—this ensures a rich, melty middle layer that’s pure indulgence.
Step 5: Add the Marshmallows and Broil
After the chocolate has softened, let the pan cool for a minute or two before pressing mini marshmallows close together over the melted chocolate. Set your oven to the broil setting and place the pan inside. This step requires your full attention—marshmallows only need about 2 minutes under the broiler to turn golden brown and perfectly toasted, so watch them carefully to prevent burning (take it from someone who learned the hard way!).
Step 6: Cool and Cut
Remove the pan from the oven and allow the bars to cool completely. For an even easier slice, chill them in the refrigerator to help set the layers firmly. When it’s time to cut, warm a sharp knife underneath hot water, dry it, and then slice through the bars—repeat this process if the knife starts sticking. This trick keeps your bars looking neat and your slicing smooth.
How to Serve S’mores Bar Recipe
Garnishes
A great way to elevate the S’mores Bar Recipe is by adding a sprinkle of crushed graham crackers or a drizzle of caramel sauce right before serving. Fresh strawberries or raspberries on the side also add a fruity contrast that brightens every bite.
Side Dishes
Serve these bars alongside a cold glass of milk or a cup of rich coffee for a perfect pairing. For a party, a scoop of vanilla ice cream or a dollop of whipped cream makes an ideal dessert companion, balancing the toasted sweetness brilliantly.
Creative Ways to Present
For a fun twist, arrange your cut bars on a rustic wooden board alongside whole graham crackers and extra marshmallows. You could even set up a DIY s’mores station where guests add their preferred toppings. Wrapping individual bars in parchment paper tied with twine creates adorable, edible party favors too!
Make Ahead and Storage
Storing Leftovers
You can store leftover S’mores Bar Recipe bars in an airtight container at room temperature or in the refrigerator for up to 3-4 days. Keeping them sealed helps preserve their gooey texture and prevents the marshmallows from becoming stale or hard.
Freezing
If you want to enjoy these bars later, freezing is a great option. Wrap individual pieces tightly in plastic wrap and then place them in a freezer-safe container or bag. They can be frozen for up to one month without losing flavor or texture.
Reheating
To reheat, simply let frozen bars thaw at room temperature or warm them briefly in the oven at a low temperature until soft. Be cautious warming to avoid melting the marshmallow topping too much—gentle warming helps bring back that fresh-out-of-the-oven goodness.
FAQs
Can I use a different type of chocolate?
Absolutely! While classic Hershey’s milk chocolate is traditional, feel free to experiment with dark chocolate, semi-sweet, or even flavored chocolate bars. Each will give the S’mores Bar Recipe its own unique touch.
Why do I need to watch the marshmallows closely under the broiler?
Marshmallows brown very quickly and can go from golden to burnt in seconds. Staring at them while broiling helps you catch that perfect toasty color without risking unwanted charring.
Can these bars be made gluten-free?
Yes! Just swap out the graham cracker crumbs for a gluten-free alternative, and ensure your chocolate and marshmallows are certified gluten-free. The rest of the recipe stays the same.
Is it okay to use regular-sized marshmallows instead of mini marshmallows?
You can, but mini marshmallows layer more evenly and toast beautifully. If you choose regular ones, consider cutting them into smaller pieces for best results.
How do I prevent the bars from sticking to the pan?
Greasing the pan well with non-stick butter spray is crucial. Additionally, using parchment paper can add an extra layer of protection, making removal and cutting much easier.
Final Thoughts
This S’mores Bar Recipe brings the magic of campfire treats right into your kitchen with minimal fuss and maximum flavor. It’s a wonderful way to share a nostalgic favorite in an easy-to-make format that’s perfect for gatherings or spontaneous sweet cravings. I can’t wait for you to make this and see how quickly it becomes a treasured classic in your own home!
“`
Print
S’mores Bar Recipe
- Prep Time: 10 minutes
- Cook Time: 15 minutes
- Total Time: 25 minutes
- Yield: 16 servings
- Category: Dessert
- Method: Baking
- Cuisine: American
Description
This S’mores Bar Recipe is a deliciously easy treat combining a buttery graham cracker crust, melted Hershey’s chocolate, and toasted mini marshmallows. Perfect as a nostalgic dessert, it’s made in under 30 minutes and yields 16 servings, ideal for parties or family gatherings.
Ingredients
Crust
- 2 Cups graham cracker crumbs
- 8–12 Tablespoons butter, melted
- 1/2 Cup powdered sugar
Topping
- 4 Hershey Chocolate Bars (4.4 ounce bars each)
- 1 package mini marshmallows
Instructions
- Preheat Oven: Preheat your oven to 350°F (175°C) to prepare for baking the crust.
- Prepare Pan: Grease a 9×13 inch baking pan with non-stick butter spray to prevent sticking.
- Mix Crust Ingredients: In a medium bowl, combine the graham cracker crumbs, powdered sugar, and melted butter. Stir well until evenly mixed.
- Press Crust: Transfer the mixture into the greased pan. Press it down firmly and evenly with your fingers, packing it along the bottom and sides to form the crust.
- Bake Crust: Bake the crust in the oven for 5-8 minutes or until the edges start to turn golden brown. Remove and let it cool; the crust will harden as it cools.
- Layer Chocolate: Arrange the Hershey chocolate bars evenly over the cooled crust, covering as much of it as possible.
- Melt Chocolate: Return the pan to the oven for about 3 minutes, or until the chocolate starts to melt and becomes shiny. Remove and let sit for 1-2 minutes.
- Add Marshmallows: Evenly distribute the mini marshmallows on top of the melted chocolate, packing them closely together.
- Broil Marshmallows: Switch your oven setting to broil. Place the pan under the broiler and watch carefully—toast the marshmallows for about 2 minutes or until they turn golden brown. Be vigilant to avoid burning.
- Cool Completely: Remove the pan and allow the bars to cool fully. For firmer bars, refrigerate them before cutting to prevent stickiness.
- Serve: Use a sharp knife warmed under hot water, dried immediately, to cut clean slices. Repeat warming the knife if it becomes sticky. Enjoy your delicious s’mores bars!
Notes
- The amount of melted butter can be adjusted between 8 to 12 tablespoons to get the desired crust firmness.
- Watch the marshmallows carefully during broiling to avoid burning, as oven broil intensity varies greatly.
- Cooling the bars in the refrigerator after baking helps the bars set properly and makes slicing easier and cleaner.
- Using a warmed sharp knife prevents the marshmallows from sticking while slicing.

