“`html
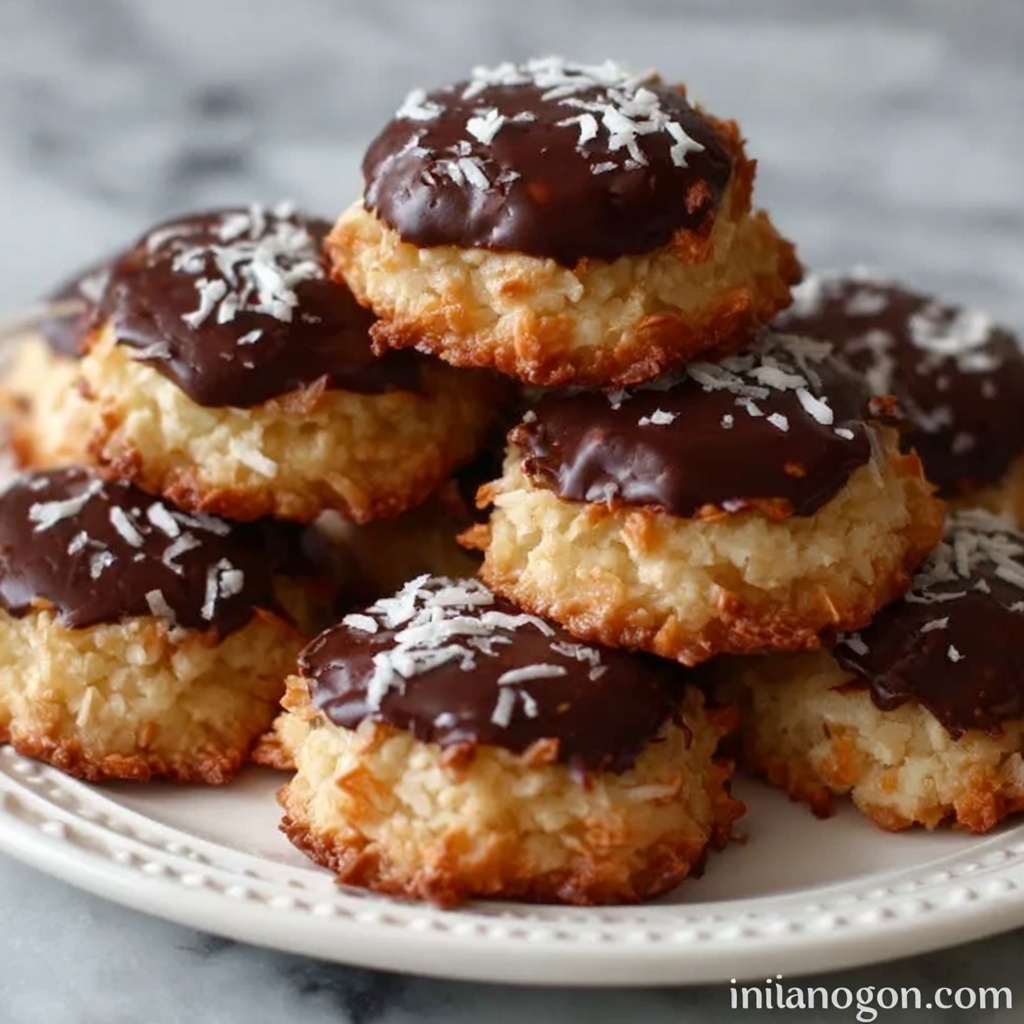
If you’ve ever wished you could capture the indulgent flavors of a classic Samoa cookie without firing up your oven, then this No-Bake Samoa Cookies Recipe is going to feel like a delicious little gift from the universe. This recipe blends toasted shredded coconut, luscious caramel, and rich chocolate into perfect bite-sized treats that are crispy, chewy, and utterly addictive. The best part? You can whip these up in under an hour, with minimal fuss, making them a wonderful sweet escape anytime you crave that iconic Samoa taste without the baking hassle.
Ingredients You’ll Need
These ingredients are refreshingly straightforward yet essential for that perfect balance of texture and flavor. Each element plays a starring role: from toasting the coconut for crispiness and aroma, to melting caramel that binds everything together with gooey goodness, to silky chocolate that adds the final indulgent flourish.
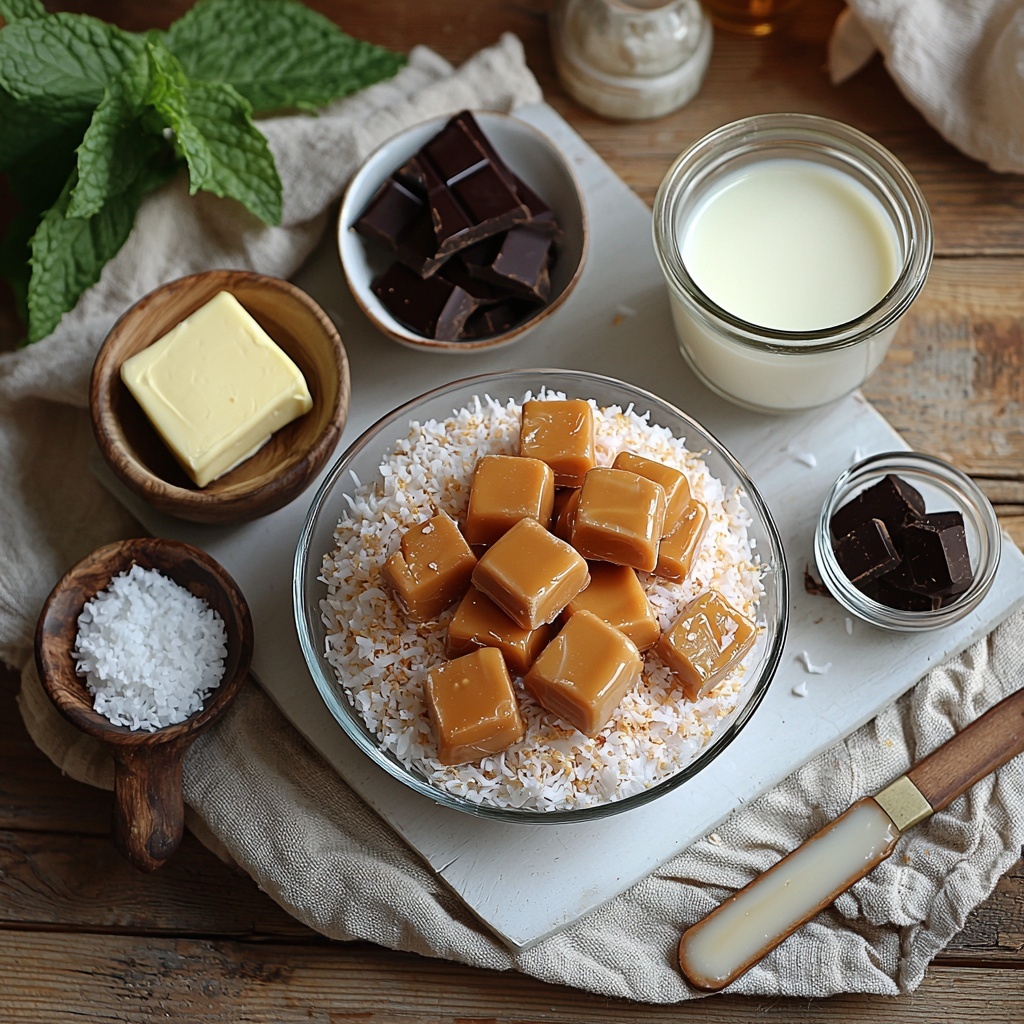
- 3 cups sweetened shredded coconut, divided: Provides that signature chewy texture and tropical sweetness, with a bit reserved for a finishing touch.
- 11 ounces soft caramel candies, unwrapped: Acts as the sticky, rich glue that holds the cookies together, offering deep buttery sweetness.
- 3 tablespoons heavy cream: Helps melt the caramel smoothly and adds luscious creaminess to the mixture.
- 2 tablespoons unsalted butter: Gives the caramel richness and a velvety mouthfeel.
- 1 teaspoon vanilla extract: Infuses the caramel with warm, aromatic depth.
- 1/4 teaspoon fine sea salt: Balances the sweetness and enhances the flavors beautifully.
- 8 ounces dark or semisweet chocolate, finely chopped: The decadent coating that adds a satisfying snap and intense cocoa flavor.
- 2 teaspoons coconut oil or neutral oil: Helps the chocolate melt silky smooth and gives it a perfect shine.
How to Make No-Bake Samoa Cookies Recipe
Step 1: Toast the Coconut
Start by lining a baking sheet with parchment paper; this will be your workspace for shaping cookies. Toasting 2 3/4 cups of shredded coconut in a dry skillet over medium heat for about 4 to 6 minutes brings out its natural oils and elevates the flavor with a lovely golden crunch. Just watch it closely and stir often so it doesn’t burn. Once toasted and brown-perfect, transfer it to a bowl to cool slightly.
Step 2: Melt the Caramel Mixture
In a small saucepan set over low heat, combine the soft caramel candies, heavy cream, and butter. Stir them gently but continuously for 3 to 5 minutes until the caramels melt completely into a smooth, silky sauce. Remove from heat, then stir in the vanilla extract and sea salt to add lovely complexity and balance to the sweet glue that will hold your cookies together.
Step 3: Combine Caramel and Coconut
Pour that warm, gooey caramel mixture over the toasted coconut. Use a sturdy spatula to mix and fold gently, ensuring every strand of coconut is luscious and shiny with caramel coating. Let the mixture rest for a few minutes to cool enough to handle, but still pliable—this is the moment your kitchen starts smelling like heaven.
Step 4: Shape the Cookies
Using a 1 1/2-tablespoon scoop or measuring spoon, carefully scoop out packed mounds of the caramel-coconut mix onto your prepared baking sheet. Press each mound lightly with damp fingers to compact and shape them well so they hold together—this step ensures the cookies won’t crumble once set.
Step 5: Chill to Set
Pop the baking sheet into the fridge for 20 to 30 minutes. This chilling firm-up helps the cookies keep their shape when you dip them in chocolate later, so patience here really pays off with the perfect final texture.
Step 6: Melt the Chocolate
In a microwave-safe bowl, combine the finely chopped chocolate and coconut oil. Heat in short 20 to 30-second bursts, stirring in between, until the chocolate melts smoothly. This dipping-ready chocolate coating is what transforms these goodies from simple treats into something gourmet and irresistible.
Step 7: Dip and Decorate
Dip the bottom of each chilled cookie into the melted chocolate, letting any excess drip back into the bowl, and set them back on your parchment-lined sheet. Then drizzle remaining chocolate over the tops, and quickly sprinkle generously with the reserved 1/4 cup of shredded coconut. This adds that signature look and extra coconutty crunch that make these cookies instantly recognizable.
Step 8: Final Chill
Refrigerate the tray again for 10 to 15 minutes until the chocolate is fully set. Once firm, your No-Bake Samoa Cookies are ready to enjoy—served slightly chilled or at a cool room temperature for the perfect bite every time.
How to Serve No-Bake Samoa Cookies Recipe
Garnishes
Adding a sprinkle of toasted coconut on top after drizzling chocolate not only looks beautiful but also enhances the texture, giving you that satisfying crispy nibble that pairs perfectly with the soft caramel inside. You can also dust lightly with a pinch of flaky sea salt to highlight the sweet-salty contrast that makes these cookies so memorable.
Side Dishes
Pair your No-Bake Samoa Cookies Recipe with a rich, creamy coffee or a classic vanilla latte for a delightful afternoon pick-me-up. For those special occasions, a scoop of vanilla bean ice cream or a dollop of whipped cream alongside adds a smooth, cool touch that balances the chewy caramel and crisp coconut.
Creative Ways to Present
Consider arranging the cookies on a decorative platter lined with tropical leaves or parchment paper sprinkled with extra toasted coconut for an inviting, island-inspired vibe. For a gift or party favor, stack a few cookies in a pretty box or tie with a ribbon and a small tag explaining they’re your homemade No-Bake Samoa Cookies Recipe treats—it’s sure to make anyone’s day brighter.
Make Ahead and Storage
Storing Leftovers
If you happen to have any leftovers (and that can be a challenge!), store them in an airtight container in the refrigerator. They’ll stay fresh and maintain their ideal chewy-crisp texture for up to 1 week, making them perfect for gradual snacking or sharing with friends throughout the week.
Freezing
These cookies freeze beautifully if you want to keep them longer. Place them in a single layer on a baking sheet to freeze initially, then transfer to an airtight container or freezer bag. They’ll keep well in the freezer for up to 3 months, allowing you to enjoy your No-Bake Samoa Cookies Recipe anytime you want a quick treat. When ready to eat, simply thaw in the fridge overnight.
Reheating
No reheating needed with these no-bake delights—they taste best slightly chilled or at cool room temperature. If you prefer them a touch soft, just leave them out for about 15 minutes before enjoying. Avoid microwaving, as it can soften the chocolate too much and change the texture.
FAQs
Can I use unsweetened coconut instead of sweetened?
Yes, you can substitute unsweetened shredded coconut, but keep in mind that sweetened coconut contributes to the signature sweet chewiness of these cookies, so you might want to add a touch of extra sugar or sweetener to taste.
Can I make these cookies vegan?
Absolutely! Swap out the butter for a plant-based alternative, use coconut cream in place of heavy cream, and ensure your chocolate is dairy-free. This way, you keep the delicious flavor and texture while making the recipe vegan-friendly.
What type of chocolate works best for these cookies?
Dark or semisweet chocolate is ideal because it balances the sweetness of the caramel and coconut nicely. You can experiment with milk chocolate if you prefer a sweeter coating, but it might be a bit less rich in contrast.
How do I prevent the cookies from falling apart?
Chilling the caramel-coconut mounds before dipping in chocolate is crucial—it firms them up so they hold their shape. Also, pressing the mixture compactly when shaping helps keep everything together.
Can I double the recipe?
Yes, this recipe scales well. Just be sure to use a large enough mixing bowl and baking sheets to handle the increased volume, and melt the caramel and chocolate in batches if needed to avoid overcrowding your pots and bowls.
Final Thoughts
Making the No-Bake Samoa Cookies Recipe is like having a little tropical vacation in cookie form right at home. The combination of toasted coconut, luscious caramel, and silky chocolate is simply irresistible, and the no-bake method means less time fussing and more time savoring these scrumptious treats. I truly hope you dive in and enjoy these sweet bites as much as I do—they have a way of turning any ordinary day into something special!
“`
Print
No-Bake Samoa Cookies Recipe
- Prep Time: 15 minutes
- Cook Time: 10 minutes
- Total Time: 45 minutes
- Yield: 24 cookies
- Category: Dessert
- Method: No-Cook
- Cuisine: American
- Diet: Vegetarian
Description
No-Bake Samoa Cookies are a delightful treat inspired by the classic Girl Scout cookie, featuring toasted coconut coated in rich, creamy caramel, and dipped in smooth dark chocolate with a sprinkle of coconut on top. This easy-to-make recipe requires no baking and comes together in under an hour, perfect for a sweet homemade indulgence.
Ingredients
Coconut
- 3 cups sweetened shredded coconut, divided
- 1/4 cup sweetened shredded coconut (reserved for topping)
Caramel Mixture
- 11 ounces soft caramel candies, unwrapped
- 3 tablespoons heavy cream
- 2 tablespoons unsalted butter
- 1 teaspoon vanilla extract
- 1/4 teaspoon fine sea salt
Chocolate Coating
- 8 ounces dark or semisweet chocolate, finely chopped
- 2 teaspoons coconut oil or neutral oil
Instructions
- Prepare baking sheet: Line a large baking sheet with parchment paper or a silicone mat and set aside. Measure 3 cups of sweetened shredded coconut, reserving 1/4 cup in a small bowl for later use as topping.
- Toast coconut: Add the remaining 2 3/4 cups coconut to a large dry skillet over medium heat. Stir frequently and toast for 4–6 minutes until the coconut is lightly golden and fragrant. Transfer toasted coconut to a large mixing bowl and allow it to cool slightly.
- Melt caramel mixture: In a small saucepan over low heat, combine the unwrapped 11 ounces soft caramel candies, 3 tablespoons heavy cream, and 2 tablespoons unsalted butter. Stir constantly for 3–5 minutes until fully melted and the mixture is smooth and glossy. Remove from heat and stir in 1 teaspoon vanilla extract and 1/4 teaspoon fine sea salt.
- Combine caramel with coconut: Pour the warm caramel mixture over the toasted coconut. Use a sturdy spatula to stir and fold until the coconut strands are evenly coated with a thick and sticky mixture. Let sit for 3–5 minutes until cool enough to handle but still pliable.
- Form cookies: Using a 1 1/2-tablespoon cookie scoop or measuring spoon, form 24 packed mounds of the caramel-coconut mixture onto the prepared baking sheet. Use slightly damp fingers to press and compact each mound so they hold together well.
- Chill cookies: Refrigerate the baking sheet for 20–30 minutes, allowing the mounds to firm up and set, which helps maintain their shape when dipped in chocolate.
- Melt chocolate: Place the 8 ounces finely chopped chocolate and 2 teaspoons coconut or neutral oil in a microwave-safe bowl. Microwave in 20–30 second intervals, stirring between each, until fully melted and smooth.
- Dip and decorate cookies: Working with one chilled cookie at a time, dip the bottom of each cookie into the melted chocolate and let excess drip back into the bowl. Return cookies to the parchment-lined baking sheet. Once all the bottoms are coated, drizzle the remaining chocolate over the cookie tops and immediately sprinkle with the reserved 1/4 cup coconut.
- Final chill and serve: Refrigerate the tray for another 10–15 minutes until the chocolate is fully set. Serve the cookies slightly chilled or at cool room temperature. Store leftovers in an airtight container in the refrigerator for up to 1 week.
Notes
- Use slightly damp fingers when shaping cookies to prevent sticking.
- Soft caramel candies should be fully melted for a smooth coating; stirring constantly prevents burning.
- Chocolate can be tempered carefully if desired, but melting with coconut oil ensures a smooth coating and easier dipping.
- Cookies can be stored refrigerated for up to one week or frozen for longer storage.
- Toasting the coconut enhances flavor and aroma but watch carefully to avoid burning.

