
If you are craving a dish that is both vibrant and elegant yet surprisingly simple to make, this Quick Miso Soy Salmon Sashimi Bowl Recipe will quickly become your new go-to favorite. Bursting with fresh flavors, a wonderful balance of savory and tangy notes, and the silky texture of sushi-grade salmon, it’s a perfect meal that feels luxurious but requires minimal effort. Whether you’re treating yourself to a weekday lunch or impressing friends at a casual dinner, this bowl brings together the best of Japanese-inspired flavors in a hearty, colorful way you’ll want to enjoy again and again.
Ingredients You’ll Need
The beauty of this Quick Miso Soy Salmon Sashimi Bowl Recipe lies in its simplicity—each ingredient plays a vital role in creating layers of flavor, adding fresh crunch, or elevating the dish’s visual appeal. You won’t need anything complicated, just high-quality components that work together perfectly.
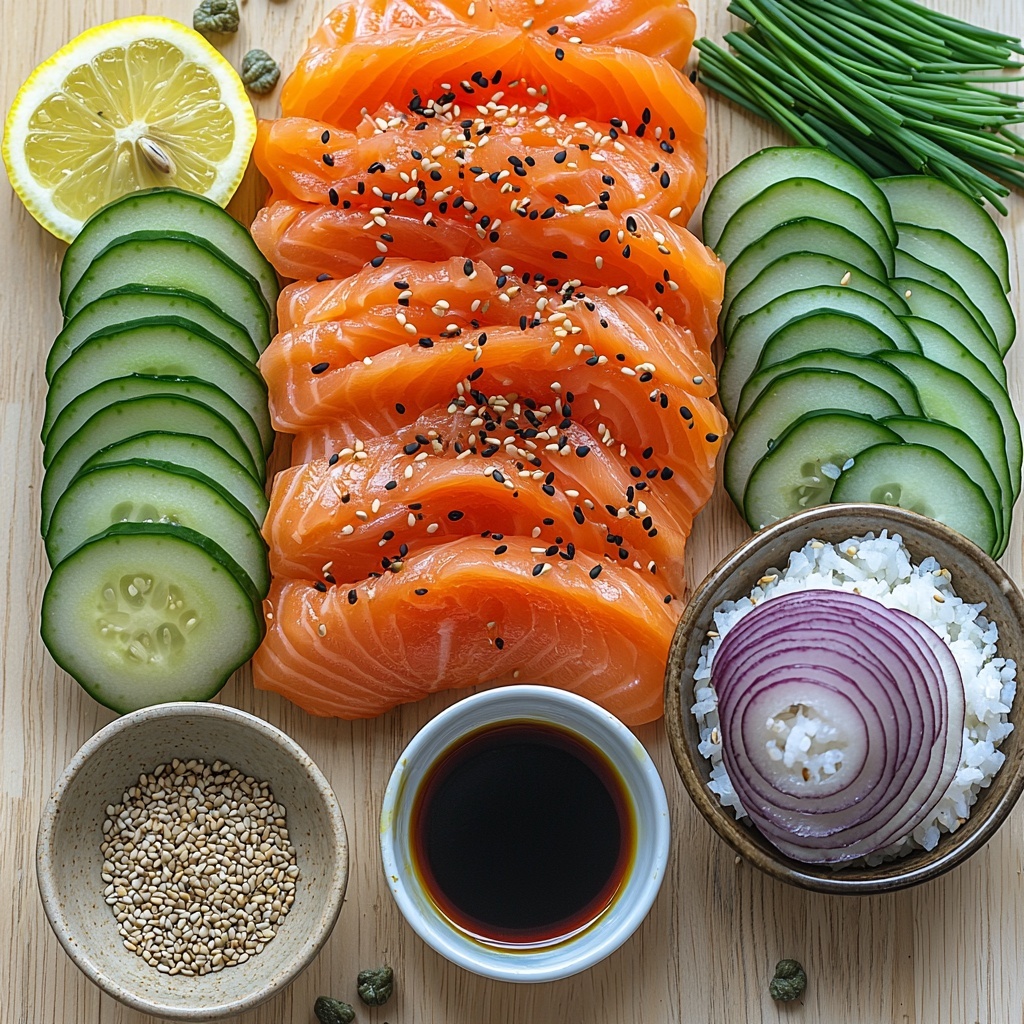
- 8 ounces Sushi-Grade Salmon: Always ensure sushi-grade for safety when enjoying raw salmon.
- 1 tablespoon Capers: Adds a tangy, briny pop that contrasts beautifully with the fish.
- 1/4 medium Red Onion: For a mild sharpness; green onions work as a gentle alternative.
- 1 medium Cucumber: Choose a firm variety to bring a crisp, refreshing crunch.
- 1 tablespoon Sesame Seeds: Toasted for nutty flavor; poppy seeds can add a fun twist.
- 1 tablespoon Chives: Fresh herbs like parsley can substitute to keep it green and vibrant.
- 2 tablespoons Olive Oil: Extra-virgin recommended for smooth richness.
- 1 teaspoon Sesame Oil: Optional but adds a deeply nutty aroma that completes the dressing.
- 2 tablespoons Soy Sauce: Use tamari if you want to keep it gluten-free.
- 2 tablespoons White Miso: White miso’s gentle sweetness is perfect; red miso can be used for a stronger taste.
- 1 tablespoon Lemon Juice: Freshly squeezed for bright acidity; lime is a tasty alternative.
- 1 teaspoon Brown Sugar: Adds a subtle sweetness to balance the savory notes; honey works well too.
- Flaky Salt: To season and enhance all the fresh flavors precisely.
- Black Pepper: Freshly cracked for a mild kick.
- 1 cup Sushi Rice: Optional base if you want a filling, nourishing bowl.
How to Make Quick Miso Soy Salmon Sashimi Bowl Recipe
Step 1: Make the Miso Soy Dressing
Start by whisking together olive oil, sesame oil, soy sauce, white miso, lemon juice, and brown sugar in a small bowl until the mixture is smooth and well combined. This luscious dressing is key to adding complexity and tying all the ingredients together with a sweet-savory zing.
Step 2: Slice the Salmon
Using a sharp knife, carefully slice the sushi-grade salmon against the grain into thin, delicate slices. The thinner the slices, the more tender and melt-in-your-mouth the sashimi will be, making every bite heavenly.
Step 3: Prepare the Veggies and Garnishes
Slice your cucumber into thin rounds and finely chop the red onion. These fresh vegetables provide a crisp, refreshing contrast to the silken salmon. Keep the chives on hand to sprinkle on top for a subtle onion-like burst and add sesame seeds for both texture and a nutty aroma.
Step 4: Assemble the Bowl
In a serving bowl, arrange your salmon slices thoughtfully, slightly overlapping to create a pretty pattern. Add cucumber slices and sprinkle over the sesame seeds, chives, and red onion. Drizzle the gorgeous miso soy dressing evenly over everything, then season with flaky salt and freshly cracked black pepper to taste. Finally, garnish with capers for a delightful hit of brininess that elevates the whole bowl.
Step 5: Optional – Serve over Sushi Rice
If you want a more substantial meal, serve your assembled bowl over a base of warm sushi rice. The rice adds a comforting texture and soaks up the flavorful dressing beautifully.
How to Serve Quick Miso Soy Salmon Sashimi Bowl Recipe
Garnishes
Adding small, thoughtful garnishes like extra chives, sesame seeds, and capers not only boosts the flavor but also makes the dish look stunning and inviting. Feel free to toss in a few microgreens or sliced avocado for a creamier texture and a pop of color.
Side Dishes
This bowl pairs wonderfully with light sides such as a simple seaweed salad or steamed edamame. You can also serve it alongside pickled ginger or a small bowl of miso soup to create a full Japanese-inspired meal experience.
Creative Ways to Present
For a dinner party or special occasion, consider serving this sashimi bowl on stylish ceramic bowls with minimalist chopsticks. Layering the salmon over rice or even a bed of mixed greens gives you seasonal flexibility. Presenting the components separately and letting guests assemble their own bowls can turn the meal into a fun, interactive experience.
Make Ahead and Storage
Storing Leftovers
If you happen to have leftovers, store the salmon sashimi bowl in an airtight container in the refrigerator. It’s best consumed within 3-4 days to maintain freshness and flavor. Avoid mixing the dressing with the fish until ready to serve, as this helps preserve texture.
Freezing
Given the fresh salmon and delicate vegetables, freezing this dish is not recommended. Salmon sashimi is best enjoyed fresh to retain its pleasing texture and safety.
Reheating
This recipe is intended to be enjoyed fresh and cold, so reheating is not advised. If you did serve it over warm sushi rice, it’s best to reheat the rice alone gently and then add the sashimi and toppings fresh at serving time.
FAQs
Can I use cooked salmon instead of sushi-grade salmon?
While you can use cooked salmon for a different twist, the texture and flavor of this sashimi bowl rely on the raw, silky quality of sushi-grade salmon. For the authentic experience and safety, always opt for sushi-grade salmon when eating raw.
What can I substitute for white miso in this recipe?
If you don’t have white miso, red miso is a good substitute but will give a stronger, earthier flavor. You could also combine a bit of miso paste with a touch of honey or brown sugar to mimic the mild sweetness of white miso.
Is this recipe suitable for a gluten-free diet?
Absolutely! Just use tamari in place of regular soy sauce to keep the dish gluten-free without sacrificing any of the umami punch from the soy sauce.
Can I prepare the miso soy dressing in advance?
Yes, the dressing can be made a day ahead and stored in the refrigerator. This actually allows the flavors to meld more deeply. Just whisk it gently before drizzling over the salmon and veggies.
How do I choose the best sushi-grade salmon?
Look for bright, firm flesh with a fresh ocean scent at your trusted fishmonger or grocery store. Sushi-grade means it’s been frozen properly to remove parasites, making it safe to eat raw. When in doubt, ask your fish supplier for certification.
Final Thoughts
This Quick Miso Soy Salmon Sashimi Bowl Recipe is a wonderful celebration of fresh ingredients and bold flavors that come together effortlessly. It’s the perfect meal when you want something special without spending hours in the kitchen. Give it a try—you might just find it becoming a staple in your meal rotation that you crave week after week!
Print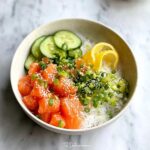
Quick Miso Soy Salmon Sashimi Bowl Recipe
- Prep Time: 10 minutes
- Cook Time: 0 minutes
- Total Time: 15 minutes
- Yield: 2 servings
- Category: Main Course
- Method: No-Cook
- Cuisine: Japanese
- Diet: Low Fat
Description
This Quick Miso Soy Salmon Sashimi Bowl is a refreshing and flavorful dish perfect for sushi lovers seeking a quick, no-cook meal. Featuring thinly sliced sushi-grade salmon paired with crisp cucumber, red onion, and capers, all drizzled with a savory miso-soy dressing, this bowl offers a delightful balance of umami, acidity, and freshness. Ready in just 15 minutes, it’s ideal for a light lunch or dinner that feels indulgent yet healthy.
Ingredients
Salmon and Garnish
- 8 ounces Sushi-Grade Salmon
- 1 tablespoon Capers
- 1/4 medium Red Onion
- 1 medium Cucumber
- 1 tablespoon Sesame Seeds
- 1 tablespoon Chives
- Flaky Salt, to taste
- Black Pepper, to taste
Dressing
- 2 tablespoons Olive Oil
- 1 teaspoon Sesame Oil (optional)
- 2 tablespoons Soy Sauce
- 2 tablespoons White Miso
- 1 tablespoon Lemon Juice
- 1 teaspoon Brown Sugar
Optional Base
- 1 cup Sushi Rice (optional)
Instructions
- Preparation: Gather all ingredients and ensure the salmon is sushi-grade for safety. Slice the red onion and cucumber into thin slices, and finely chop the chives.
- Make the Dressing: In a small bowl, whisk together olive oil, sesame oil, soy sauce, white miso, lemon juice, and brown sugar until smooth and well combined. Taste and adjust seasoning if needed.
- Slice the Salmon: Using a sharp knife, carefully slice the sushi-grade salmon against the grain into very thin, delicate slices suitable for sashimi.
- Assemble the Bowl: Arrange the salmon slices in an overlapping pattern in a serving bowl. Add the cucumber slices, sprinkle with sesame seeds, chopped chives, and red onion pieces evenly over the top.
- Add Dressing and Season: Drizzle the prepared miso-soy dressing evenly over the salmon and vegetables. Season with flaky salt and freshly ground black pepper to taste.
- Garnish and Serve: Top the bowl with capers as garnish and serve immediately. Optionally, place the salmon and veggies over a base of sushi rice for a more substantial meal.
Notes
- Always use sushi-grade salmon to ensure safety when consuming raw fish.
- For gluten-free option, substitute soy sauce with tamari.
- Adjust sweetness of the dressing by varying the brown sugar or substituting with honey for a different flavor profile.
- The sesame oil adds a nutty aroma but can be omitted if preferred.
- This dish is best served fresh and not stored for long periods due to the raw fish.
- Use extra-virgin olive oil for the best flavor in the dressing.
- Optional sushi rice base makes the dish more filling but is not necessary.
