
If you are craving a warm, comforting meal that wraps you up like a cozy blanket, this Cheesy Chicken Enchiladas for Cozy January Nights Recipe is exactly what you need. It combines tender shredded chicken with melty Mexican-blend cheese, all smothered in rich red enchilada sauce and baked to bubbly perfection. This dish is the kind of homey cooking that makes chilly winter evenings instantly better, offering vibrant flavors and satisfying textures that come together effortlessly. Trust me, once you make these enchiladas, they will become your go-to comfort food for those quiet nights in January.
Ingredients You’ll Need
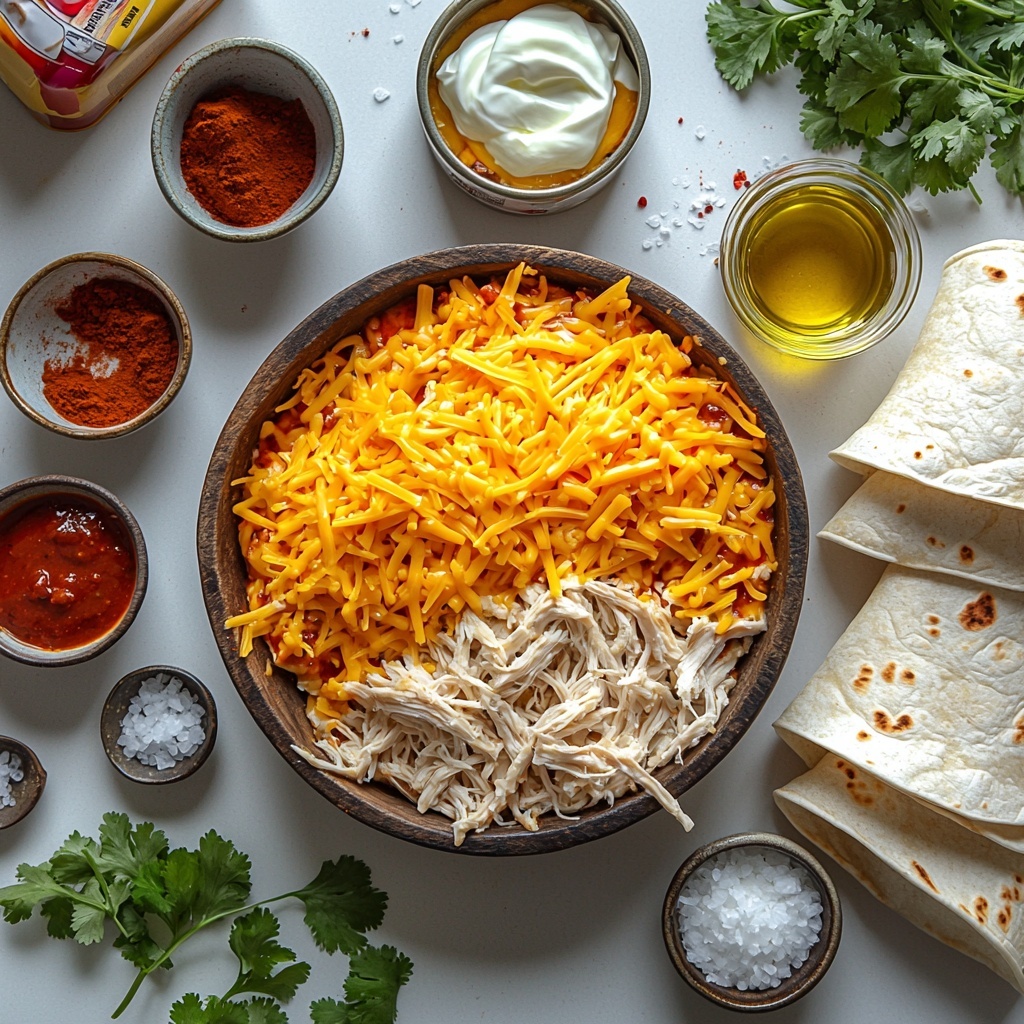
This recipe is all about simplicity and quality ingredients, each playing a crucial role in building layers of flavor, texture, and that inviting color that makes enchiladas so irresistible. With just a handful of pantry staples and fresh touches, you’ll be ready to create a dish that feels both indulgent and approachable.
- 2 cups cooked shredded chicken: Use rotisserie chicken for a quick shortcut or homemade chicken for extra tenderness.
- 2 cups shredded Mexican-blend cheese or cheddar and Monterey Jack blend: Dividing the cheese ensures creamy filling and a golden, bubbly topping.
- 1 can (10 ounces) red enchilada sauce: This vibrant sauce delivers bold flavor and moisture to keep the enchiladas perfectly saucy.
- 1/2 cup sour cream: Adds smooth creaminess and balances the spices in the filling.
- 1/2 teaspoon ground cumin: Offers a warm, earthy base note that’s essential for authentic taste.
- 1/2 teaspoon chili powder: Brings gentle heat and smoky depth without overpowering the dish.
- 1/4 teaspoon garlic powder: Enhances savory richness with subtle garlic flavor.
- Salt and black pepper to taste: Simple seasonings that elevate every component.
- 8 small flour tortillas: Soft and pliable, the perfect vessel to hold all the deliciousness.
- 1 tablespoon olive oil for greasing the pan: Prevents sticking and adds a touch of richness.
- 2 tablespoons chopped fresh cilantro (optional): A fresh, herbal finish that adds brightness and color.
How to Make Cheesy Chicken Enchiladas for Cozy January Nights Recipe
Step 1: Prepare Your Oven and Baking Dish
Start by preheating your oven to 375°F to ensure it’s ready when your enchiladas are assembled. Lightly grease a 9×13-inch baking dish with olive oil. This step helps the enchiladas bake evenly without sticking, making clean-up a breeze.
Step 2: Mix the Filling
In a large bowl, combine your shredded chicken with 1 cup of the shredded cheese, sour cream, ground cumin, chili powder, garlic powder, salt, and black pepper. Stir everything until you have a creamy, well-seasoned mixture. This blend is the savory heart of the dish, providing layers of flavor and that delightful melty texture inside each tortilla.
Step 3: Roll the Enchiladas
Lay each flour tortilla flat and spoon an even amount of the chicken mixture down the center. Roll each tortilla tightly to encase the filling and place it seam-side down in your prepared baking dish. This sealing of the tortilla keeps the filling secure as it bakes.
Step 4: Add Sauce and Cheese Topping
Pour the red enchilada sauce evenly over all the rolled tortillas, making sure each one is covered generously. This sauce not only adds flavor but also keeps the enchiladas juicy and tender during baking. Then sprinkle the remaining cheese over the top for that irresistible golden crust.
Step 5: Bake Until Bubbling and Delicious
Bake the enchiladas uncovered for 25 to 30 minutes. Keep an eye out for the cheese on top to melt into bubbly, slightly browned perfection. When done, remove the baking dish from the oven and let the enchiladas rest for 5 minutes before serving so the flavors can fully settle and the filling won’t be too hot to enjoy.
How to Serve Cheesy Chicken Enchiladas for Cozy January Nights Recipe
Garnishes
Finishing touches like chopped fresh cilantro add not only vibrant green color but also a refreshing herbal brightness that contrasts wonderfully with the cheesy, rich enchiladas. You can sprinkle some extra cheese or even a dollop of sour cream for creaminess and visual appeal.
Side Dishes
This dish pairs beautifully with classic sides like fluffy Mexican rice or refried beans to soak up every bit of enchilada sauce. If you want something lighter, a crisp green salad dressed with lime and olive oil offers a refreshing balance to the richness.
Creative Ways to Present
For a festive touch, serve the enchiladas on colorful plates with lime wedges on the side and a sprinkle of sliced jalapeños for a little kick. Layering some avocado slices or a bright tomato salsa can add depth and a pop of freshness, making your cozy January nights feel extra special.
Make Ahead and Storage
Storing Leftovers
Leftover enchiladas are a dream for next-day meals. Store them in an airtight container in the refrigerator for up to 3 days. The flavors actually deepen, making reheated enchiladas just as delicious as fresh from the oven.
Freezing
You can freeze the enchiladas either before or after baking. Wrap the baking dish tightly with plastic wrap and foil or transfer individual portions to freezer-safe containers. Frozen enchiladas will keep well for up to 3 months, ready to thaw and warm up whenever you need a comforting meal.
Reheating
Reheat enchiladas in the oven at 350°F for about 15-20 minutes covered with foil to maintain moisture. Alternatively, use a microwave for a quick reheat but cover with a damp paper towel to prevent drying out. Either way, you’ll get gooey, flavorful enchiladas all over again.
FAQs
Can I make this recipe vegetarian?
Absolutely! Swap the chicken for roasted vegetables like zucchini, peppers, and mushrooms or use black beans for a hearty, flavorful vegetarian version of this Cheesy Chicken Enchiladas for Cozy January Nights Recipe.
What kind of cheese is best to use?
A Mexican-blend cheese or a mix of cheddar and Monterey Jack works best because they melt beautifully and provide a balanced flavor that complements the spices and sauce.
Can I use corn tortillas instead of flour?
Yes, corn tortillas work fine, but be sure to warm them first to make them pliable and prevent cracking when rolling, especially since flour tortillas are naturally softer.
Is this recipe spicy?
This dish has a mild warmth from chili powder but is not overly spicy, making it a perfect comfort food for those who want a gentle kick without too much heat.
How can I add more creaminess to the filling?
For extra creamy enchiladas, try stirring in a few tablespoons of cream cheese with the chicken and sour cream mixture before rolling. This addition will make the filling even richer and more indulgent.
Final Thoughts
This Cheesy Chicken Enchiladas for Cozy January Nights Recipe is pure comfort in every bite. It’s simple to make but packed with flavor and heartwarming goodness that’s perfect for cold evenings. I hope you give these enchiladas a try and find yourself coming back to them time and time again as your ultimate cozy meal.
Print
Cheesy Chicken Enchiladas for Cozy January Nights Recipe
- Prep Time: 20 minutes
- Cook Time: 30 minutes
- Total Time: 50 minutes
- Yield: 4 servings
- Category: Main Course
- Method: Baking
- Cuisine: Mexican-American
Description
These Cheesy Chicken Enchiladas are a perfect cozy meal for January nights, combining tender shredded chicken with a flavorful blend of spices, creamy sour cream, and melted Mexican cheese, all wrapped in soft flour tortillas and baked to bubbly perfection.
Ingredients
Chicken Filling
- 2 cups cooked shredded chicken
- 1 cup shredded Mexican-blend cheese or cheddar and Monterey Jack blend
- 1/2 cup sour cream
- 1/2 teaspoon ground cumin
- 1/2 teaspoon chili powder
- 1/4 teaspoon garlic powder
- Salt and black pepper to taste
Assembly and Topping
- 8 small flour tortillas
- 1 can (10 ounces) red enchilada sauce
- 1 cup shredded Mexican-blend cheese or cheddar and Monterey Jack blend (remaining)
- 1 tablespoon olive oil for greasing the pan
- 2 tablespoons chopped fresh cilantro (optional)
Instructions
- Preheat and Prepare Pan: Preheat the oven to 375°F and lightly grease a 9×13-inch baking dish with olive oil to prevent sticking and ensure even baking.
- Mix Filling: In a large bowl, combine the shredded chicken, 1 cup of the cheese, sour cream, ground cumin, chili powder, garlic powder, salt, and black pepper. Mix well until all ingredients are thoroughly incorporated and the mixture is creamy and flavorful.
- Fill Tortillas: Spoon an even amount of the chicken mixture down the center of each tortilla. Roll each tortilla tightly around the filling and place them seam-side down in the prepared baking dish in a single layer.
- Add Sauce and Cheese: Pour the red enchilada sauce evenly over the rolled tortillas, ensuring they are completely covered. Then sprinkle the remaining 1 cup of shredded cheese evenly over the top of the sauce-covered enchiladas.
- Bake: Bake the enchiladas uncovered in the preheated oven for 25 to 30 minutes, or until the cheese is fully melted, bubbly, and starting to brown slightly, and the dish is heated through.
- Rest and Garnish: Remove the enchiladas from the oven and allow them to rest for 5 minutes to set. Garnish with chopped fresh cilantro if desired before serving.
Notes
- Rotisserie chicken works especially well for this recipe and saves time.
- For extra creaminess, add a few tablespoons of cream cheese to the chicken filling.
- Serve these enchiladas with sides like rice, beans, or a simple green salad for a complete meal.
- Make sure to tightly roll the tortillas to avoid filling spilling out during baking.
- Adjust seasoning to taste, especially salt and chili powder, depending on preferred spice level.


