
If you are searching for a delightful treat that combines the charm of homemade desserts with effortless preparation, this Easy Mini Fruit Pies with Flaky Crust Recipe is an absolute must-try. These charming little pies pack a burst of fresh, fruity flavor wrapped in a tender, flaky crust that simply melts in your mouth. Perfect for any occasion, they’re quick to make, fun to assemble, and guaranteed to impress your friends and family with their beautiful presentation and delicious taste. Whether you choose apples, berries, peaches, or pears as your filling, each bite offers a perfect harmony of sweet, tart, and buttery goodness.
Ingredients You’ll Need
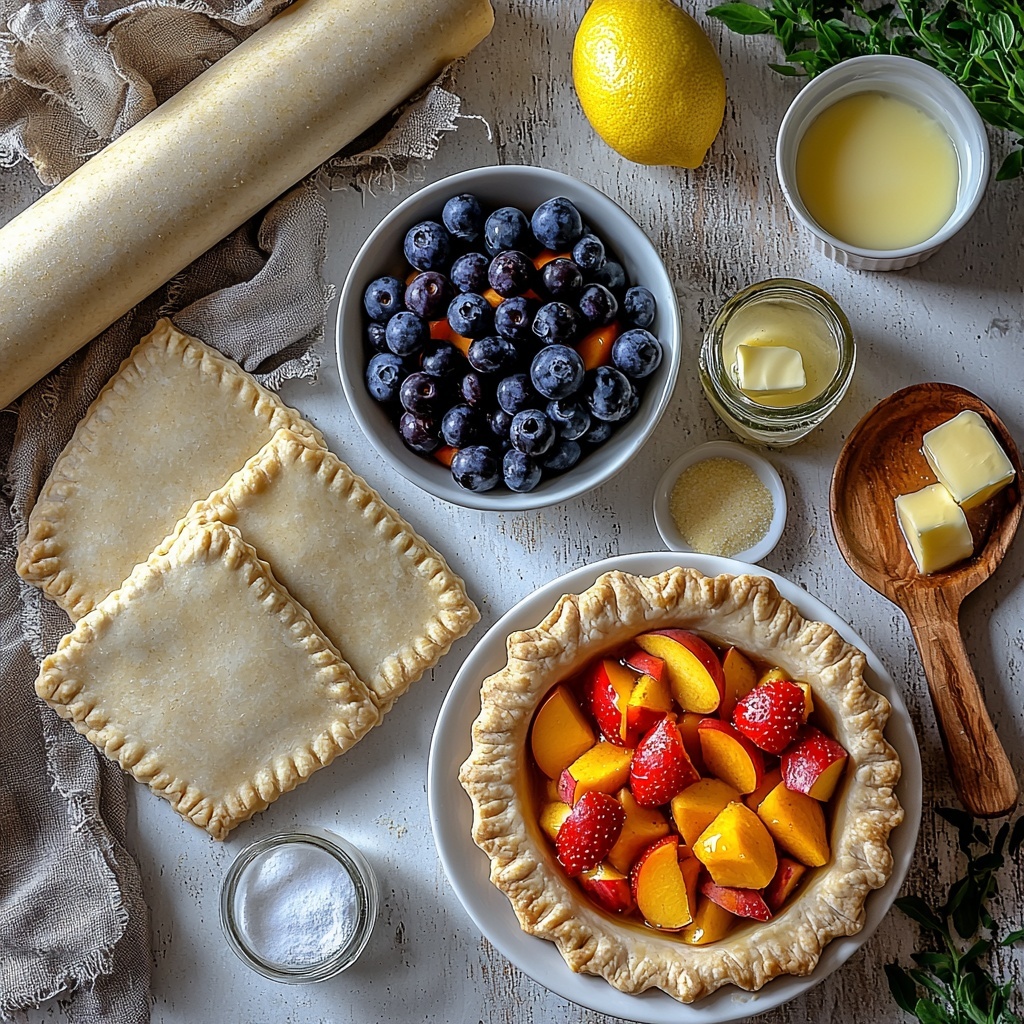
Gathering simple, fresh ingredients is the best way to ensure your Easy Mini Fruit Pies with Flaky Crust Recipe turns out perfectly every time. Each ingredient plays a key role, delivering the taste, texture, and vibrant colors that make these pies so irresistible.
- Pie crust: Two standard 9-inch pie crusts, store-bought or homemade provide the flaky base for your mini pies.
- Diced fruit (2 cups): Apples, berries, peaches, or pears—choose one or mix for exciting flavor variations.
- Granulated sugar (1/3 to 1/2 cup): Sweetens the filling, adjusted to balance the fruit’s natural sweetness.
- Cornstarch (1.5 to 2 tablespoons): Thickens the filling for a luscious, not runny, texture.
- Vanilla extract (1 teaspoon): Adds warmth and depth to the fruit flavors.
- Lemon zest (1 teaspoon) and lemon juice (1 tablespoon): Brighten the filling with fresh, citrusy notes.
- Spices (optional): Half a teaspoon of ground cinnamon or cardamom and a pinch of nutmeg bring cozy spice undertones.
- Cold butter (2 tablespoons, cubed): Enriches the filling with creamy, buttery bursts.
- Egg wash: One beaten egg mixed with 1 tablespoon milk or water ensures a golden, shiny crust.
- Coarse sugar (optional): Sprinkled on top for crunchy, sparkling finishes.
How to Make Easy Mini Fruit Pies with Flaky Crust Recipe
Step 1: Prep Your Pan and Oven
Start by preheating your oven to 375°F (190°C) for that perfect baking temperature. Lightly grease your standard 12-cup muffin pan or line it with paper liners; this helps your pies come out smoothly and keeps cleanup simple.
Step 2: Make the Fruit Filling
In a large bowl, combine your chosen fruit with the sugar, cornstarch, lemon zest, lemon juice, vanilla extract, and optional spices. Stir gently but thoroughly until the fruit is coated evenly and shines with a luscious gloss. Letting the mixture sit for 5 to 10 minutes helps the fruit release its juices, which deepens the flavor and sweetness.
Step 3: Roll Out the Pie Crust
On a lightly floured surface, roll your pie dough to approximately 1/8-inch thickness—thin enough to bake up crisp and flaky but sturdy to hold the filling. Using a 3 to 3.5 inch round cutter or drinking glass, cut out 12 rounds for the pie bottoms. Remember to gather scraps and reroll as needed to avoid waste.
Step 4: Fit the Crust into Muffin Pan Cups
Press each pastry round gently into the muffin pan cups, ensuring the dough comes up the sides to cradle the filling later. Placing the pan in the fridge to chill for 10 minutes now stops the dough from shrinking during baking—a handy trick for beautifully shaped pies.
Step 5: Fill the Pies
Carefully spoon your prepared fruit mixture into each crust-lined cup, filling most of the way but leaving a little space at the top. Dotting a tiny cube of cold butter on top of the filling in each cup adds a rich, buttery finish as it melts during baking.
Step 6: Add the Pie Tops
Cut smaller pastry rounds about 2.5 inches in diameter or craft fun shapes like hearts or stars for the pie tops. Alternatively, simple lattice strips provide a gorgeous peek at the fruit filling beneath while allowing steam to escape. Remember to cut vents if fully covering the pies so the filling can bubble without causing a soggy crust.
Step 7: Brush and Sprinkle
Brush each pie top with your egg wash mixture, which encourages that golden-brown, glossy finish we all love. For an extra touch of sparkle and crunch, sprinkle coarse sugar across the tops—it’s a small detail that makes a big difference.
Step 8: Bake to Perfection
Bake your mini pies for 18 to 24 minutes, keeping an eye out for a golden crust and bubbling filling. Halfway through baking, rotate the pan to ensure even browning and consistent cooking—a simple step that guarantees gorgeous pies.
Step 9: Cool the Mini Pies
Once baked, allow the pies to cool in the pan for about 10 minutes so the filling firms up nicely. Gently loosen the edges with a small knife or spatula before transferring them to a wire rack to cool completely or serve warm.
Step 10: Serve and Enjoy
These Easy Mini Fruit Pies with Flaky Crust Recipe are delightful on their own, but pairing them with a scoop of vanilla ice cream or a dollop of whipped cream takes them over the top. Enjoy fresh, warm, or at room temperature for a sweet bite-sized treat perfect for sharing.
How to Serve Easy Mini Fruit Pies with Flaky Crust Recipe
Garnishes
A light dusting of powdered sugar, a swirl of whipped cream, or a small scoop of vanilla or cinnamon ice cream complements the warm fruit filling exquisitely. Fresh mint leaves or delicate edible flowers can add a pretty finishing touch for gatherings and parties.
Side Dishes
These mini pies pair wonderfully with a cup of hot tea, coffee, or a sweet dessert wine. For brunch or dessert tables, add fresh fruit salads, creamy custards, or a cheese platter to round out the spread in a tempting, balanced way.
Creative Ways to Present
Try serving these mini pies on decorative plates or tiered dessert stands to make your table pop. Personalize with individual name tags for parties or wrap a few in parchment and tie with twine for cute take-home favors. You can also experiment with different fruit combinations and crust shapes to suit seasonal celebrations or holidays.
Make Ahead and Storage
Storing Leftovers
Keep any leftover mini pies covered tightly with plastic wrap or in an airtight container at room temperature for up to two days. If your environment is warmer, storing them in the fridge will keep them fresh for up to four days, making them perfect for leftovers or snacks.
Freezing
These mini pies freeze beautifully either baked or unbaked. To freeze unbaked, assemble the pies completely, wrap the pan tightly, and freeze for up to a month before baking. For baked pies, cool completely, wrap individually or as a batch, and freeze for the same duration. When ready, thaw overnight in the fridge before reheating.
Reheating
To enjoy your pies warm, reheat in a 350°F (175°C) oven for about 10-12 minutes until the crust regains its flakiness and the filling is warm throughout. Avoid microwaving, which can make the crust soggy. A little oven love brings back that fresh-baked magic beautifully.
FAQs
Can I use frozen fruit for the filling?
Absolutely! Frozen fruit works well, especially berries, but be sure to thaw and drain excess liquid before mixing in the other ingredients to avoid soggy crusts.
Is it okay to make the pie crust from scratch?
Definitely, homemade pie crusts add a wonderful personal touch and buttery flavor. Use your favorite recipe or a simple all-butter crust for best flaky results.
What if I don’t have a muffin pan?
You can use mini tart pans or even silicone baking molds with similar sizes. Just adjust baking time slightly if needed, and keep an eye on browning.
Can these mini pies be made gluten-free?
Yes, by substituting the pie crust with a gluten-free crust recipe or store-bought gluten-free dough, you can enjoy these treats without gluten. Just handle the crust gently as gluten-free doughs can be more fragile.
How can I prevent the crust from getting soggy?
Chilling the crust-lined muffin pan before adding filling helps prevent shrinking and sogginess. Also, using a thickener like cornstarch and dotting butter on top of the filling creates a seal that keeps the crust crisp.
Final Thoughts
This Easy Mini Fruit Pies with Flaky Crust Recipe is one of those gems that brings joy with every step—from assembling tiny pies to sharing the sweet results. Treat yourself, your family, or guests to these delightful bite-sized treasures that show just how simple and rewarding homemade baking can be. Trust me, once you try this recipe, you’ll be reaching for it again and again!
Print
Easy Mini Fruit Pies with Flaky Crust Recipe
- Prep Time: 15 minutes
- Cook Time: 24 minutes
- Total Time: 39 minutes
- Yield: 12 mini pies
- Category: Dessert
- Method: Baking
- Cuisine: American
- Diet: Vegetarian
Description
These Easy Mini Pies are perfect bite-size desserts that are simple to make and crowd-pleasing. Featuring a buttery flaky crust filled with your choice of sweetened fruit filling, these mini pies are ideal for parties, snacks, or anytime you want a charming, delicious treat. Customize the filling with apples, berries, peaches, or pears, and enjoy a perfectly golden, tender dessert that’s fun to bake and eat.
Ingredients
Pie Crust
- 2 standard 9-inch pie crusts (store-bought or homemade)
Fruit Filling
- 2 cups diced apples (peeled) or 2 cups berries (blueberries, strawberries, raspberries), or 2 cups diced peaches or pears
- 1/3–1/2 cup granulated sugar (adjust to fruit sweetness)
- 1.5–2 tablespoons cornstarch (or 3 tablespoons flour)
- 1 teaspoon vanilla extract
- 1 teaspoon lemon zest
- 1 tablespoon lemon juice
- 1/2 teaspoon ground cinnamon or cardamom (optional)
- Pinch of nutmeg (optional)
Additional
- 2 tablespoons cold butter, cut into tiny cubes
- 1 egg beaten with 1 tablespoon milk or water (for egg wash)
- Coarse sugar for topping (optional)
Instructions
- Prep your pan and oven: Preheat the oven to 375°F (190°C). Lightly grease a standard 12-cup muffin pan or line it with paper liners to make removing the mini pies easier after baking.
- Make the filling: In a mixing bowl, combine the chosen fruit, granulated sugar, cornstarch, lemon zest, lemon juice, vanilla extract, and optional spices. Stir well until the fruit is evenly coated and the mixture looks glossy. Let it rest for 5–10 minutes to allow the fruit to release its juices and the thickener to activate.
- Roll out the crust: On a lightly floured surface, roll the pie dough to about 1/8-inch thickness. Use a 3–3.5 inch round cutter or a drinking glass to cut out 12 rounds for the pie bottoms. Gather the scraps and reroll as needed to get all the circles.
- Fit the crust: Gently press each dough round into the muffin cups, making sure the dough comes up the sides to form little crust cups. Place the muffin pan in the refrigerator for 10 minutes to chill and help prevent the dough from shrinking during baking.
- Fill the pies: Spoon the fruit filling into each dough-lined cup, leaving a little space at the top. Dot each filled cup with a tiny cube of cold butter to add richness and flavor.
- Top the pies: Cut smaller rounds (about 2.5 inches) or use small shapes such as hearts or stars for partial tops. Alternatively, create thin lattice strips from the crust dough. If you cover the entire top, be sure to cut a small vent to allow steam to escape during baking.
- Brush and sprinkle: Lightly brush the tops of the pies with the beaten egg wash to ensure a shiny, golden crust. Sprinkle coarse sugar on top for an extra sparkle and crunchy texture, if desired.
- Bake: Bake the mini pies in the preheated oven for 18–24 minutes until the crust is golden brown and the fruit filling is bubbling. Rotate the pan halfway through baking to ensure even browning of all pies.
- Cool: Remove the mini pies from the oven and let them cool in the pan for about 10 minutes. Then carefully loosen the edges and transfer the pies to a wire rack to cool completely. Cooling helps the filling to set properly.
- Serve: Enjoy the mini pies warm or at room temperature. They are delicious on their own or served with a small scoop of vanilla ice cream for an extra special treat.
Notes
- Adjust the amount of sugar based on the sweetness of your chosen fruit to avoid overly sweet or tart pies.
- Using cold butter in the filling adds richness and helps create a luscious texture.
- Ensure to vent pies with full tops to prevent cracking by letting steam escape.
- Pie crust can be homemade or store-bought for convenience.
- These mini pies freeze well, wrap tightly and thaw before serving.
- Experiment with different fruits or combinations for unique flavor profiles.

