
If you’ve ever wondered how to create that perfectly creamy, luscious dessert right in your own kitchen, this Homemade Vanilla Pudding Recipe is going to be your new best friend. There’s something incredibly satisfying about whisking together simple ingredients to create a smooth, velvety pudding that tastes like it was made with love (because it was!). With each bite, you’ll experience a silky texture paired with rich vanilla flavor, making it an irresistible classic treat that feels both nostalgic and delightfully fresh.

Ingredients You’ll Need
This pudding relies on a handful of kitchen staples, each carefully chosen to build the perfect balance of flavor, texture, and color. The simplicity here is what makes this pudding truly shine, so quality is key!
- Whole milk: Provides the creamy base and rich mouthfeel that defines the pudding’s texture.
- Butter: Adds a subtle silkiness and mouth-coating richness to the final pudding.
- Pure vanilla extract: Brings that signature sweet aroma and warm vanilla flavor that makes the pudding exceptional.
- Cornstarch: The natural thickener that ensures your pudding sets perfectly without any lumps.
- Sugar: Sweetens the pudding just right without overpowering the delicate vanilla taste.
- Pinch of salt: Enhances and balances all the sweet flavors, making each bite more vibrant.
- Egg yolks: Contribute to the pudding’s rich color, lush texture, and help thicken the custard beautifully.
How to Make Homemade Vanilla Pudding Recipe
Step 1: Prepare the Cornstarch Slurry
Start by whisking together ¼ cup of cold whole milk with the cornstarch until perfectly smooth. This slurry is your secret weapon against lumps, ensuring your pudding turns out silky and uniform. Set it aside and let it work its magic later.
Step 2: Heat the Milk Mixture
Next, pour the remaining milk into a medium saucepan along with the sugar and a pinch of salt. Warm this mixture over medium heat, stirring occasionally to fully dissolve the sugar. Watch closely until it’s steaming but not boiling — this gentle warmth prepares the milk perfectly for the next steps.
Step 3: Temper the Egg Yolks
Whisk the egg yolks in a small bowl until they’re smooth and slightly frothy. To prevent curdling, slowly drizzle about ½ cup of the hot milk mixture into the yolks while whisking continuously. This gradual warming “tempers” the yolks, preparing them for cooking. Then pour the yolk mixture back into the saucepan and add your cornstarch slurry. Keep whisking as the pudding begins to thicken and gently simmer — this is where the creamy magic happens!
Step 4: Final Touches
Remove the pan from heat and stir in the butter and pure vanilla extract. These finishing additions bring the pudding’s flavor to a whole new level, providing depth, richness, and that unforgettable vanilla aroma.
Step 5: Chill or Serve Warm
Pour the pudding into individual serving dishes and press a piece of plastic wrap directly onto the surface to avoid forming a skin. You can enjoy it immediately while warm or refrigerate it for several hours for a refreshingly cool treat.
How to Serve Homemade Vanilla Pudding Recipe
Garnishes
Simple garnishes can elevate your pudding into a stunning dessert. Try sprinkling a little ground cinnamon, nutmeg, or cocoa powder for a hint of warmth. Fresh berries, sliced bananas, or a dollop of whipped cream add both color and complementary flavors that brighten each spoonful.
Side Dishes
Vanilla pudding pairs beautifully with crunchy cookies, biscotti, or even a warm fruit compote. Serving it alongside a crisp shortbread or a buttery tart delivers a delightful contrast of textures to impress your guests or simply indulge yourself.
Creative Ways to Present
For a special touch, layer the pudding with crumbled cookies or fruit in a glass jar to create elegant parfaits. Alternatively, try piping it into mini tart shells for an eye-catching treat that’s perfect for parties or special occasions.
Make Ahead and Storage
Storing Leftovers
Your Homemade Vanilla Pudding Recipe keeps beautifully in the fridge for up to 3 days when stored in an airtight container. Just make sure to keep that plastic wrap pressed against the surface to prevent a skin from forming before covering. Give it a gentle stir before serving to refresh the silky texture.
Freezing
While freezing pudding isn’t generally recommended due to changes in texture, if you must freeze leftovers, do so in an airtight container for up to 1 month. Thaw overnight in the refrigerator, then stir gently; however, the pudding may be slightly grainy compared to fresh preparation.
Reheating
If you prefer your pudding warm again, gently reheat it over low heat on the stove, stirring frequently to prevent scorching. Avoid microwave reheating whenever possible to keep the smooth, creamy consistency of your Homemade Vanilla Pudding Recipe intact.
FAQs
Can I use milk alternatives in this pudding?
Yes! While whole milk gives the creamiest texture, you can substitute with almond or oat milk for a dairy-free version. Keep in mind texture and taste might be a bit lighter, but still delicious.
Why is tempering the egg yolks important?
Tempering gradually raises the egg yolks’ temperature to prevent them from scrambling when mixed with hot milk. This step ensures your pudding stays silky smooth without unwanted lumps.
Can I make this pudding without eggs?
Eggs add richness and help thicken the pudding, but if you prefer an egg-free version, increasing cornstarch slightly and using just milk and cream can still yield a tasty pudding, though the texture will be a bit different.
How thick should the pudding be before I remove it from heat?
Look for the pudding to thicken enough to coat the back of a spoon and show a gentle simmer. It should hold its shape when stirred but still be soft and creamy once chilled.
What causes a skin to form on pudding and how do I avoid it?
The skin forms as the pudding cools due to a thin layer of protein drying out. Pressing plastic wrap directly on the surface stops air from reaching it, preventing that unwanted skin from developing.
Final Thoughts
There’s truly nothing like making this Homemade Vanilla Pudding Recipe from scratch—watching simple ingredients transform into a creamy, dreamy dessert is such a joyful experience. Whether you serve it warm or chilled, you’re sure to create a dessert everyone will adore. So grab your whisk, warm up your stove, and have fun with this timeless and comforting treat that’s bound to become a favorite in your kitchen too!
Print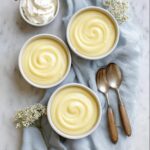
Homemade Vanilla Pudding Recipe
- Prep Time: 5 minutes
- Cook Time: 15 minutes
- Total Time: 20 minutes
- Yield: 6 servings
- Category: Dessert
- Method: Stovetop
- Cuisine: American
Description
This homemade vanilla pudding recipe delivers a smooth, creamy dessert that’s perfect for any occasion. Made with simple ingredients like whole milk, egg yolks, sugar, and pure vanilla extract, this pudding is gently cooked on the stovetop until it thickens to the perfect silky consistency. Whether served warm or chilled, this classic vanilla pudding is a comforting treat that’s easy to prepare from scratch.
Ingredients
Liquid and Dairy
- 3 cups whole milk, divided
- 1 tablespoon butter
- 1 teaspoon pure vanilla extract
Dry Ingredients
- 3 tablespoons cornstarch
- ¾ cup sugar
- Pinch of salt
Eggs
- 3 egg yolks
Instructions
- Make the cornstarch slurry: In a small bowl, whisk together ¼ cup of the milk with the cornstarch until smooth. This helps prevent lumps later when cooking the pudding.
- Heat milk and dissolve sugar: In a medium saucepan, combine the remaining 2¾ cups of whole milk with the sugar and a pinch of salt. Warm over medium heat until the mixture is steaming but not boiling, stirring occasionally to fully dissolve the sugar.
- Temper the egg yolks: Whisk the egg yolks in a separate small bowl until smooth. Slowly add ½ cup of the hot milk mixture to the yolks in a thin stream, whisking constantly to temper them and avoid curdling. Then pour the tempered egg mixture back into the saucepan along with the cornstarch slurry.
- Cook until thickened: Continue cooking the mixture over medium heat, whisking constantly, until the pudding thickens and just begins to simmer.
- Finish the pudding: Remove the saucepan from heat and stir in the butter and pure vanilla extract until fully incorporated and the pudding is smooth.
- Chill or serve warm: Pour the pudding into individual serving dishes, then place a layer of plastic wrap directly on the surface to prevent a skin from forming. Serve immediately warm or refrigerate for several hours until thoroughly chilled.
Notes
- Whisking constantly while cooking prevents lumps and keeps the pudding smooth.
- Tempering the egg yolks avoids scrambling them when combined with hot milk.
- Placing plastic wrap on the pudding surface prevents a skin from forming during chilling.
- This pudding can be served warm or cold, depending on your preference.
- For a richer flavor, use whole milk, but 2% milk can be substituted for a lighter version.
