
If you’re searching for a breakfast that’s delicious, comforting, and comes together in a flash, then this Easy Cheesy Breakfast Rolls: A Quick Morning Delight! Recipe is about to become your new favorite morning treat. Imagine warm, golden crescent rolls oozing with melted cheese and savory bits of bacon or sausage, all wrapped up in a cozy, flaky crust. It’s the kind of breakfast that feels indulgent yet requires minimal effort—perfect for busy mornings or lazy weekends when you deserve something special without the fuss.
Ingredients You’ll Need
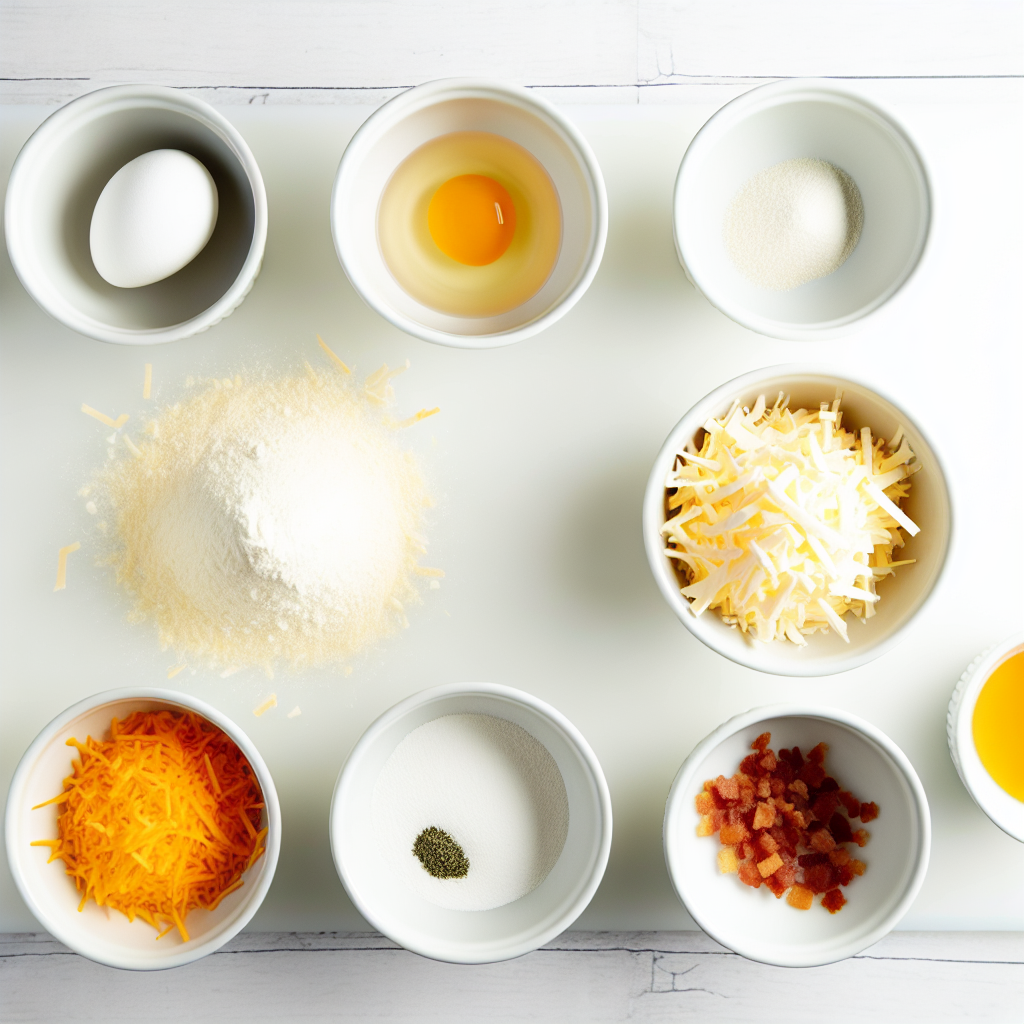
The beauty of this Easy Cheesy Breakfast Rolls: A Quick Morning Delight! Recipe lies in its simplicity. Each ingredient plays a crucial role, from the flaky crescent dough providing an irresistibly tender base, to the melty cheese delivering rich creaminess, and the optional meat adding a smoky punch that wakes up your taste buds.
- Crescent roll dough: Use refrigerated dough for easy handling and a perfectly flaky texture.
- Shredded cheese: Cheddar is classic, but feel free to use your favorite melting cheese for flavor twists.
- Cooked bacon or sausage: Optional, but highly recommended to bring a savory, meaty note.
- Egg: Used for an egg wash to give your rolls that beautiful golden-brown shine.
- Garlic powder: Sprinkled on top to add a subtle, savory aroma.
- Dried herbs: Optional, but herbs like oregano or thyme elevate the flavor with a fresh, herby touch.
How to Make Easy Cheesy Breakfast Rolls: A Quick Morning Delight! Recipe
Step 1: Prep Your Oven
Start off by preheating your oven to 375°F (190°C). It’s essential to get it nice and hot so your rolls bake evenly and develop that perfect golden color.
Step 2: Prepare the Dough
Unroll your refrigerated crescent dough and gently separate it into triangles. This pre-portioned dough makes assembling these rolls quick and mess-free.
Step 3: Add the Filling
Sprinkle a generous amount of shredded cheese along with your cooked bacon or sausage (if using) onto the wide base of each triangle. This is where all the gooey, savory magic happens.
Step 4: Roll It Up
Roll each triangle up starting from the wide end toward the pointed tip, making sure to seal the edges well so none of the tasty filling escapes during baking.
Step 5: Prepare for Baking
Lay your rolled-up creations on a parchment-lined baking sheet, giving them a little space so they bake evenly and don’t stick together.
Step 6: Egg Wash Time
Whisk the egg and brush it generously over each roll. This step ensures your finished rolls have that irresistible glossy, golden crust.
Step 7: Add Seasonings
Sprinkle garlic powder and your choice of dried herbs on top for a fragrant and delicious finishing touch. This elevates the flavor profile and adds an inviting aroma while baking.
Step 8: Bake Until Golden
Bake in the preheated oven for 12 to 15 minutes or until your rolls are perfectly puffed up and turned a gorgeous golden brown on top.
Step 9: Cool and Serve
Once baked, allow your rolls to cool slightly, so the cheese sets just enough to enjoy without burning your mouth. These easy cheesy breakfast rolls are best enjoyed warm and gooey!
How to Serve Easy Cheesy Breakfast Rolls: A Quick Morning Delight! Recipe
Garnishes
Top your rolls with fresh chopped parsley or chives for a pop of color and fresh flavor. A dash of hot sauce or a drizzle of honey can also add a fun twist to the taste experience.
Side Dishes
Serve these rolls alongside fresh fruit, a simple green salad, or a cup of your favorite coffee or tea. Their rich and cheesy nature pairs especially well with something light and refreshing.
Creative Ways to Present
Arrange your rolls on a wooden board for a charming rustic look, or place them in a lined basket to bring cozy comfort to your breakfast table. Even stacking them into a pyramid makes for an inviting buffet-style presentation!
Make Ahead and Storage
Storing Leftovers
If you have any leftover rolls (which may be hard to believe), store them in an airtight container at room temperature for up to two days. This keeps them fresh and ready for quick snacks.
Freezing
For longer storage, freeze your fully baked rolls in a sealed bag or container for up to one month. Thaw overnight in the fridge before reheating to maintain their texture and flavor.
Reheating
Reheat rolls in a preheated oven at 350°F (175°C) for about 5 to 7 minutes to regain their crispy edges and melted cheese goodness. Microwaving is possible but may yield a softer crust.
FAQs
Can I use different types of cheese?
Absolutely! While cheddar is classic in this recipe, mozzarella, pepper jack, or a cheese blend work wonderfully to customize the flavor to your liking.
Is it possible to make these rolls vegetarian?
Yes, simply skip the bacon or sausage and add veggies like sautéed spinach or mushrooms for a delicious vegetarian alternative.
Can I prepare these rolls the night before?
You can assemble the rolls and store them covered in the refrigerator overnight, then bake fresh in the morning for a quick, hassle-free breakfast.
What if I don’t have crescent roll dough?
If refrigerated crescent dough isn’t available, puff pastry or homemade biscuit dough can be creative substitutes, though the texture will vary slightly.
How do I prevent the rolls from leaking cheese during baking?
Make sure to seal the edges of the dough tightly when rolling and avoid overfilling each piece to keep all that cheesy goodness inside.
Final Thoughts
This Easy Cheesy Breakfast Rolls: A Quick Morning Delight! Recipe is a total game-changer on those mornings when you want something utterly satisfying without spending hours in the kitchen. Whether you make them for yourself, family, or friends, these rolls bring a little extra joy and warmth to the start of your day. I cannot wait for you to try them and see just how quickly these cheesy bites become a beloved staple in your breakfast lineup!
Print
Easy Cheesy Breakfast Rolls: A Quick Morning Delight! Recipe
- Prep Time: 10 minutes
- Cook Time: 15 minutes
- Total Time: 25 minutes
- Yield: 8 rolls
- Category: Breakfast
- Method: Baking
- Cuisine: American
Description
Easy Cheesy Breakfast Rolls are a quick and delicious morning treat made with crescent roll dough, melted cheese, and optional savory bacon or sausage. Perfectly golden and flaky, these rolls come together effortlessly and are ideal for a busy breakfast or brunch.
Ingredients
Rolls
- 1 can refrigerated crescent roll dough
- 1 cup shredded cheese (cheddar or your choice)
- 1/2 cup cooked and crumbled bacon or sausage (optional)
Toppings & Seasoning
- 1 egg (for egg wash)
- 1 tablespoon garlic powder
- 1 tablespoon dried herbs (optional)
Instructions
- Preheat Oven: Preheat your oven to 375°F (190°C) to ensure it’s ready when your rolls are assembled.
- Prepare Dough: Unroll the crescent roll dough and carefully separate it into individual triangles along the pre-scored lines.
- Add Fillings: On the wide end of each triangle, evenly sprinkle shredded cheese and the optional cooked and crumbled bacon or sausage.
- Roll the Dough: Starting from the wide end, tightly roll each triangle toward the point, making sure to seal the edges so the filling doesn’t spill out during baking.
- Arrange on Baking Sheet: Place the rolled crescents seam side down onto a baking sheet lined with parchment paper for easy cleanup.
- Apply Egg Wash: Beat the egg until smooth, then brush it evenly over the top of each roll to create a glossy, golden finish once baked.
- Season Rolls: Lightly sprinkle the tops with garlic powder and dried herbs if using, to add extra flavor and aroma.
- Bake Rolls: Bake in the preheated oven for 12-15 minutes, or until the rolls are puffed up and golden brown on top.
- Cool and Serve: Remove the baking sheet from the oven and let the rolls cool for a few minutes before serving for the best texture and safety.
Notes
- Feel free to substitute the cheese with any preferred type such as mozzarella, pepper jack, or Swiss.
- For a vegetarian option, omit the bacon or sausage and add sautéed vegetables or mushrooms instead.
- These rolls can be prepared in advance and baked fresh in the morning for convenience.
- Store leftovers in an airtight container and reheat in the oven to maintain crust crispiness.


