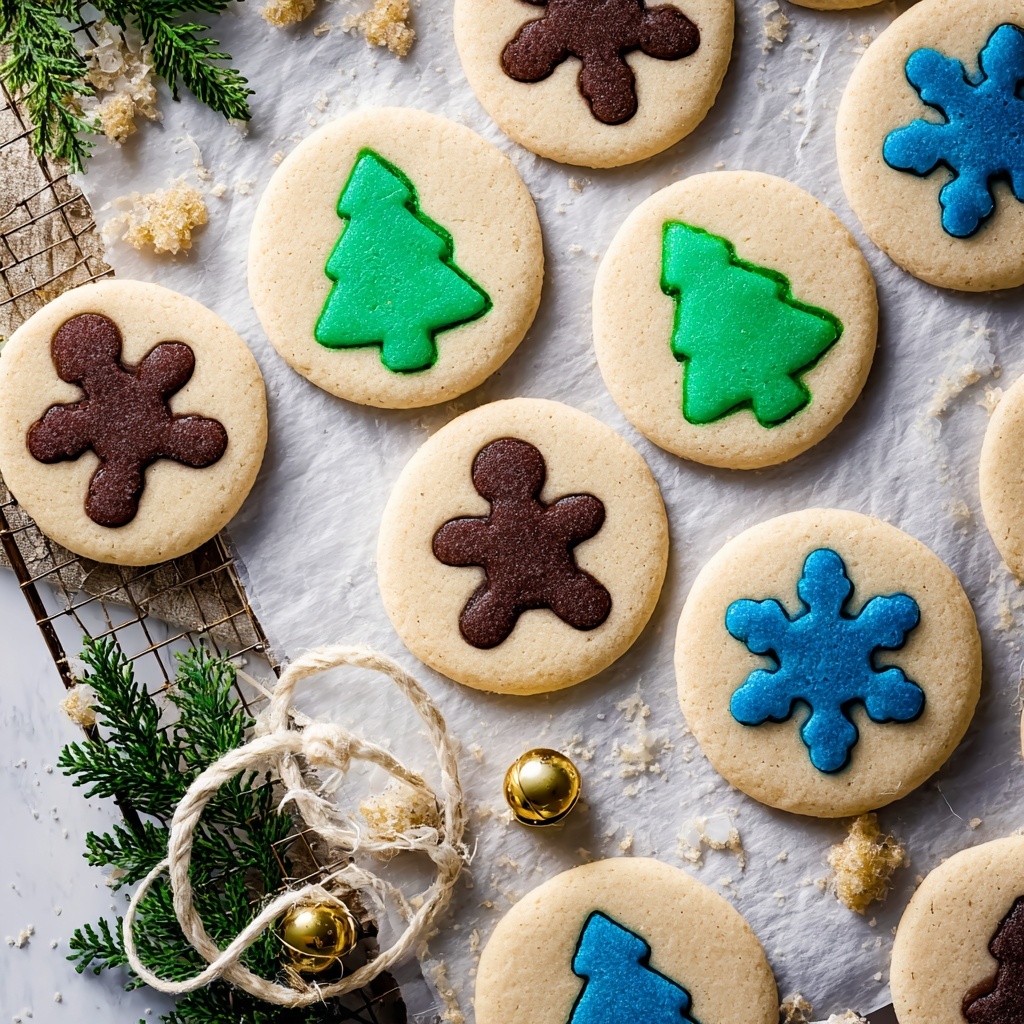
If you’re hunting for a festive treat that combines fun, flavor, and the magic of Christmas in every bite, look no further than this Slice-and-Bake Christmas Cookies Recipe. These charming cookies let you play with vibrant colors and joyful shapes, making holiday baking not just a task but a joyful celebration. Creamy butter, a touch of vanilla, and beautifully colored dough come together for a crunchy yet tender cookie that’s perfect for decorating, gifting, or simply sharing around the warm glow of your holiday tree.
Ingredients You’ll Need
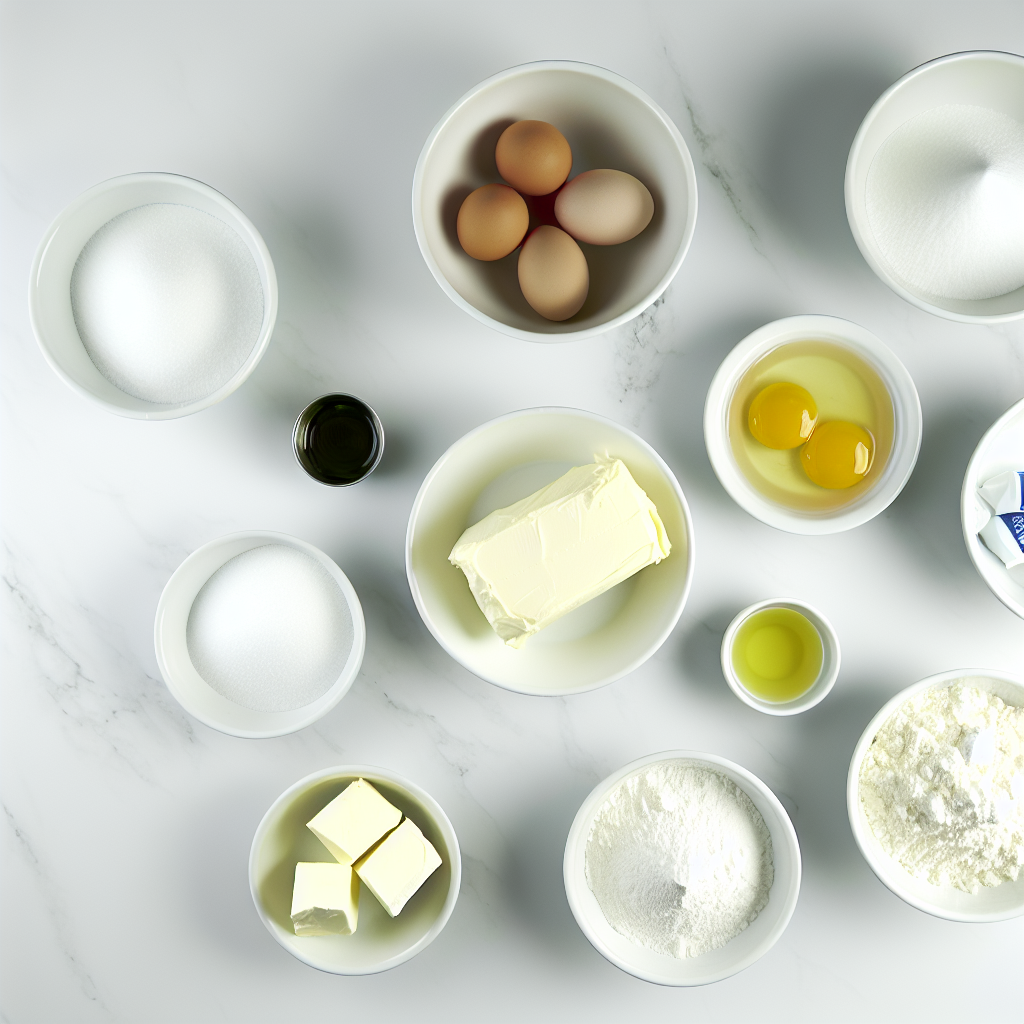
Simple, wholesome, and essential, the ingredients here come together seamlessly to create cookies that are both stunning and scrumptious. Each plays a vital role—unsalted butter for richness and tenderness, sugars for balanced sweetness, and flour for that perfect structure you want in a cookie.
- Unsalted butter (1 cup, softened): Provides creamy richness and helps achieve a soft, tender texture.
- Confectioners’ sugar (3/4 cup): Adds smooth sweetness that melts easily during baking.
- White sugar (3/4 cup): Brings a delightful crunch and sweetness to complement the confectioners’ sugar.
- Vanilla extract (1 ½ teaspoons): Infuses warmth and enhances all the other flavors beautifully.
- Eggs (2): Bind the dough while adding moisture and richness.
- All-purpose flour (4 cups): The foundation of the dough that creates a tender but sturdy cookie.
- Baking powder (3/4 teaspoon): Provides subtle lift for a light bite.
- Salt (1/4 teaspoon): Balances sweetness and deepens flavor complexity.
- Gel food coloring: The secret to those vibrant, festive hues that bring Christmas cheer to every slice.
How to Make Slice-and-Bake Christmas Cookies Recipe
Step 1: Prepare the Dry Ingredients
Start by whisking together the flour, baking powder, and salt in a large bowl. This ensures your leavening agent and salt are evenly distributed, giving you a consistent cookie base without any surprises.
Step 2: Cream the Butters and Sugars
In a separate bowl, beat your softened butter with the confectioners’ and white sugars until the mix is light and fluffy—about three minutes. This step is essential as it creates air pockets, contributing to a tender crumb and delightful texture.
Step 3: Add Vanilla and Eggs
Next, blend in the vanilla extract and eggs until fully combined and smooth. These ingredients add moisture and flavor, carrying the scent of Christmas right through to the finished cookie.
Step 4: Combine Wet and Dry Ingredients
Slowly add the dry flour mixture to your wet ingredients, mixing until a soft dough forms. It should have a pliable feel but should not be sticky, making it easy to work with during the coloring and shaping stages.
Step 5: Divide and Refrigerate Dough
Wrap two-thirds of the plain dough in plastic and chill it. Divide the remaining third into portions based on how many colors you want—and this is where the fun really begins—add vibrant gel coloring to each portion, then refrigerate all wrapped dough for at least one hour to develop firmness and flavor melding.
Step 6: Shape and Freeze Colored Dough
Roll your colored dough to about half an inch thick, use mini cookie cutters to get adorable Christmas shapes, then stack identical shapes into firm, tall piles. Freeze these stacks for four hours or more—this step locks in your festive designs.
Step 7: Form the Logs
Let the plain dough soften to a workable consistency. Wrap it firmly around each frozen colored stack, pressing gently to ensure the shapes stick well and fill every crevice. Roll into even logs, wrap tightly, then freeze again for a minimum of four hours or overnight.
Step 8: Bake Your Cookies
Preheat your oven to 350°F and line baking sheets with parchment paper. Allow logs to thaw slightly before slicing very thinly into quarter-inch cookies. Bake for 9-10 minutes until the edges are just turning golden. The result is a crisp yet tender cookie that beautifully showcases your layered, colorful designs.
How to Serve Slice-and-Bake Christmas Cookies Recipe
Garnishes
While these cookies shine on their own thanks to their intricate colors and shapes, consider a light dusting of powdered sugar or a drizzle of white chocolate for extra festive flair. Fresh cranberries or edible glitter can also add sparkle that makes these cookies pop on any holiday table.
Side Dishes
Pair your cookies with classic holiday beverages—think a rich eggnog, steaming hot cocoa crowned with whipped cream, or a robust spiced tea. Each sip complements the buttery sweetness and ensures a perfectly cozy holiday treat.
Creative Ways to Present
Wrap the sliced cookies in decorative cellophane tied with festive ribbon for charming homemade gifts. Or arrange them on a tiered platter with holly sprigs for a Christmas dessert centerpiece that’s as delightful to look at as it is to eat.
Make Ahead and Storage
Storing Leftovers
Once cooled, keep your cookies fresh by storing them in an airtight container at room temperature. They stay tender and flavorful for about 5 to 7 days, perfect for nibbling throughout the season.
Freezing
If you want to bake ahead even more, freeze the unbaked logs tightly wrapped in plastic. When you’re ready to bake, simply slice and bake from frozen—just add a minute or two to the baking time. This approach is a lifesaver when holiday time gets hectic.
Reheating
To enjoy the cookies warm, pop them in a preheated oven at 300°F for 3-5 minutes. This quickly revives their crispness and that comforting just-baked aroma that makes everyone say, “Ahh, Christmas is here!”
FAQs
Can I use regular food coloring instead of gel?
You can, but gel food coloring is recommended because it provides brighter colors without adding extra liquid to the dough, which can affect texture.
How thin should I slice the cookies?
A ¼-inch thickness is perfect for baking evenly while maintaining structure and a satisfying crunch.
Why do I need to freeze the dough stacks and logs?
Freezing solidifies the dough layers so your shapes don’t blur during slicing or baking, preserving those beautiful holiday designs.
Can I omit the food coloring for a classic cookie?
Absolutely! The plain dough is delicious on its own, offering a buttery vanilla flavor that’s timeless and elegant.
Are these cookies gluten-free?
The recipe uses all-purpose flour, so they are not gluten-free. However, you can experiment with gluten-free flour blends to suit dietary needs, keeping in mind the texture might vary slightly.
Final Thoughts
This Slice-and-Bake Christmas Cookies Recipe is one of those treasures that make holiday baking fun, creative, and absolutely delicious. Whether you’re baking with family or gifting to friends, these colorful, flavorful cookies bring joy straight from your oven to everyone you share them with. So grab your butter and colors, and start your sweetest holiday tradition today!
Print
Slice-and-Bake Christmas Cookies Recipe
- Prep Time: 25 minutes
- Cook Time: 10 minutes
- Total Time: 5 hours 35 minutes (including chilling and freezing times)
- Yield: 20-24 cookies
- Category: Baking
- Method: Baking
- Cuisine: American
Description
These Slice and Bake Christmas Cookies feature a soft buttery dough with colorful, festive shapes embedded inside. Perfect for holiday celebrations, this method allows for preparing cookies ahead of time by freezing logs of dough and slicing them just before baking. The combination of vanilla-flavored dough and vibrant gel food coloring creates visually appealing treats that are crisp on the edges and tender inside.
Ingredients
Main Dough Ingredients
- 1 cup (227 grams) unsalted butter, softened
- 3/4 cup (90 grams) confectioners’ sugar
- 3/4 cup (150 grams) white sugar
- 1 1/2 teaspoons vanilla extract
- 2 eggs
- 4 cups (480 grams) all-purpose flour
- 3/4 teaspoon baking powder
- 1/4 teaspoon salt
Additional
- Gel food coloring (various colors as desired, e.g., green, brown, blue)
Instructions
- Mix Dry Ingredients: In a large mixing bowl, whisk together the all-purpose flour, baking powder, and salt until evenly combined. Set this mixture aside for later use.
- Cream Butter and Sugars: In a separate large mixing bowl, use a hand mixer to beat the softened unsalted butter, confectioners’ sugar, and white sugar together until the mixture becomes light and fluffy, approximately 3 minutes.
- Add Vanilla and Eggs: Pour in the vanilla extract and eggs, then continue beating the mixture until it is smooth and fully combined.
- Combine Wet and Dry: Gradually add the dry flour mixture to the wet ingredients, beating until a soft dough forms. The dough should not be sticky to touch.
- Prepare Dough Portions: Wrap and refrigerate two-thirds of the plain dough for later use. Divide the remaining one-third of the dough into portions equal to the number of colors you want to create (e.g., green, brown, blue).
- Add Color to Dough: Incorporate gel food coloring into each divided dough portion. Mix thoroughly either with a hand mixer or by kneading with hands wearing gloves. Wrap each colored dough portion tightly in plastic wrap and refrigerate for at least 1 hour.
- Shape Colored Dough: Remove the colored dough from the fridge and roll each color out to about 1/2 inch thickness. Use mini cookie cutters to cut small shapes. Stack identical cut shapes into tall, firm piles. Repeat for each color. Freeze these stacks for at least 4 hours to harden them.
- Soften Plain Dough: After about 3 hours of freezing the shaped stacks, take out the plain dough from refrigeration and leave it at room temperature for about 1 hour to soften.
- Form Cookie Logs: Take the frozen stack of shapes and press the softened plain dough around it to form a log shape, ensuring the stack is centered inside. For shapes with intricate corners or crevices (like snowflakes), press small bits of plain dough into those areas before fully wrapping.
- Smooth and Freeze Logs: Roll the logs gently between your hands until they are smooth, round, and even. Wrap the logs tightly in plastic wrap and freeze for at least 4 hours or overnight.
- Preheat Oven and Prepare Baking Sheets: Preheat your oven to 350°F (175°C) and line two baking sheets with parchment paper to prevent sticking.
- Slice and Bake Cookies: Remove the frozen logs from the freezer and allow them to sit for about 20 minutes so they soften slightly for easier slicing. Using a sharp knife, slice the logs into 1/4-inch thick cookies. Place the slices on the prepared baking sheets, spacing them slightly apart. Bake the cookies for 9-10 minutes, or until they are set and lightly golden at the edges.
Notes
- Make sure the dough is not sticky before wrapping; if it feels sticky, add a little more flour to achieve the correct texture.
- Wearing gloves when kneading colored dough helps prevent staining your hands.
- Freezing the dough stacks and logs thoroughly is essential to retain the shape and ensure clean slices.
- Thin slices of 1/4 inch help the cookies bake evenly and hold their shape without spreading too much.
- Store baked cookies in an airtight container at room temperature for up to one week or freeze for longer storage.


